
3 Things I Learned From My First Mountain Bike Tour
Aug
A couple weeks ago I conducted my first off-road mountain bike tour.
I’ve toured for months on a mountain bike in the past, but this was my first time traveling entirely on dirt fire roads and rocky single-track trails.
This first off-road mountain bike touring adventure may have just been a short 2-day, 1-night adventure, but I learned a lot from the experience… and I’d like to take a moment to share with you the three biggest things I learned from this short mountain biking expedition.
1. When Mountain Bike Touring – Pack As Little As Possible

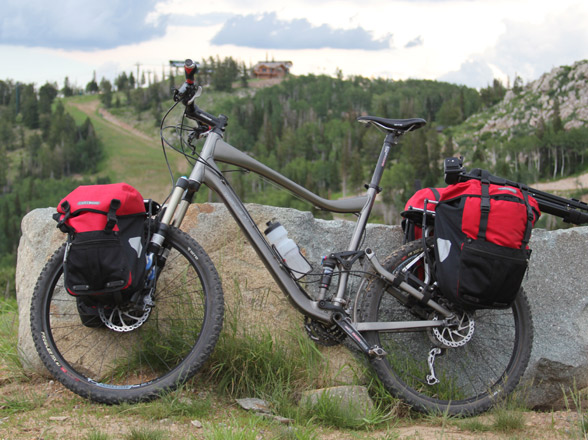
For this first mountain biking tour of mine, I had two main goals. 1) Get away from home for a little while (and away from the computer)… and 2) test out the Freeload touring racks that were sent to me from New Zealand.
Because I wanted to test out the Freeload racks mounted on both the front and rear ends of my bicycle, I decided to pack four full panniers and stuffed them with more things than I would normally take on a regular bicycle touring expedition. In addition to the four panniers I was carrying, I also had a full set of camping gear, a change of clothes, a book to read, a tripod, and three different cameras mounted on my bike.
Going across town and riding on paved roads was no problem whatsoever. Even with all that weight mounted on my bicycle, the vehicle handled well. In fact, it felt as though I were traveling on my regular loaded touring bike (with a few small differences due to the fact that the weight on my fully-loaded mountain bike was positioned slightly differently than the way I have it positioned on my regular touring bike).
But once I hit the mountains and began traveling off-road, my fully-loaded mountain bike became nothing but a burdon. The bike was heavy, slow and loud. Uphill, the bike seemed to weigh a ton. On rocky trails I had to travel so slow I was barely moving. And on steep uphills I had to actually get off the bike and push. In fact, on one super-steep trail, I had to actually unload the panniers and carry them up the mountainside on their own, then hike back down, get my bike, and carry it up the trail as well.
I quickly realized that if I’m ever to do an off-road mountain bike tour again, I need to pack a whole lot less. I think I could get by with a single set of panniers on the back of my bicycle, but I’d want to leave the front panniers at home. An even better option would be to figure out a way to carry everything I need using Freeload sport racks. This way of transporting my things would mean a lot less jiggling on the bike, which I’ll speak about in just a moment.
2. Don’t Forget The Keys To Your Bike Lock

After a full day of cycling, I made camp at the top of a colorful mountain pass with near 360 degree views. I set up my tent, prepared my sleeping area, and threw my gear inside my portable home. Then (because I wanted to write this article for you about how to lock up your bicycle when there is nothing around to actually lock it to) I locked my bicycle to my tent.
But as soon as the lock clicked shut, I realized I had made a terrible, terrible mistake. I had forgotten to pack the key to my bike lock. I had left the key at home!
As soon as I realized my mistake, I grabbed my cell phone and called my neighbor Mark. I explained to Mark what I had done and asked him if he would do me a huge favor by fetching the keys from my house and driving them to me at a point high in the mountains. Because I was about 4 miles away from the closest road, I explained to Mark that I would start walking down to the road right away… and that I’d meet him there later in the evening. About 40 minutes later, I met Mark on a desolate dirt road high in the mountains and he handed me my keys (my savior!). I then spent the next hour-and-a-half walking uphill and four miles back in the direction of my tent while the sun set far off in the distance.
I had wanted this short 2-day bike tour to be a relaxing night in the mountains, but because I forgot to pack my keys it quickly turned into a nerve-wracking and physically demanding experience. And it all happened due to one simply mistake – I forgot the key to my bike lock.
Lucky for me, this accident occured within a short radius of my home and I had people to call who were willing to help me out. If I had made this same mistake on a longer bicycle touring expediton where I might be a super long distance from home or anyone I know, this could have turned out to be a much bigger ordeal.
Whoops! I won’t make that mistake again.
3. Some Panniers Are Better For Off-Road Touring Than Others
Finally, the most interesting thing I learned from this short mountain bike tour, is that some bicycle panniers simply arn’t made for mountain bike touring, while others are certainly more equipped for the demands of off-road travel.
On my short 2-day tour, I was using a set of Ortlieb panniers to carry all my gear. Unfortunately, I quickly realized that this was a mistake, and that I would have been better off had I used a set of Lone Peak, Arkel, or similar style panniers instead.
You see, on the back of all bicycle panniers is some kind of attachment system, which works to hold the panniers to the racks of your bicycle. Most (but not all) panniers have two hooks at the top of the pannier (which allow the pannier to hang off the top of the rack) and a hook of some kind at the bottom of the pannier, which wraps around a small part of the rack to keep the pannier bottom from flopping around on the bike. This bottom portion of the pannier attachment system, I learned, is the most important part of the pannier when it comes to off-road mountain bike touring.
This bottom hook on the backside of the pannier is usually designed in one of two ways.
The first and most basic bottom hook is exactly that. It is a hook that simply slides behind a portion of your bicycle’s rack… and for road touring, this is usually enough to keep the pannier from bouncing around on the rack while the bicycle is in motion. (The photo below is a good example of this type of bottom hook – shown here on a Pacific Outdoor Equipment waterproof pannier.)

As you can see in the following photo, my Ortlieb pannier’s bottom hook does a good job of sliding into one of the grooves on the Freeload rack’s pannier sides.

The problem, however, is that on bumpy, rocky roads and trails, the bottom hooks on these types of panniers jump out of place, causing the pannier as a whole to bounce and jiggle around as you travel about on your bicycle. The hooks at the top of the pannier hold the pannier to the rack, but the hook at the bottom of the pannier becomes useless after a few good shakes.
The second type of bottom pannier hook, however, is the type shown below (shown here on a set of Arkel XM-45 bicycle panniers). This type of bottom hook is not just a regular free-standing hook, but a hook tied to a bungee cord. The bungee acts as a pulling mechanism, which when in place on the rack of your bicycle, not only hooks around a portion of the bike rack, but keeps the hook (and pannier as a whole) locked in place.

On a regular road tour, it usually doesn’t matter what type of bottom hook you have on your panniers, because on a road tour there are less bumps in the road that might cause your pannier hooks to bounce out of place. But on an off-road bicycle touring expedition, the road is sure to be bumpy and your panniers need this extra bungee feature in order to keep the panniers from bouncing around on the racks.
At the moment, the only panniers I’ve ever used in the past that have this bungee locking system on the back and are actually designed for mountain bike touring are Lone Peak and Arkel panniers.
As you can see, I learned some valuable lessons from this short 2-day mountain bike tour.
- Pack as little as possible.
- Don’t forget your keys!
- And make sure you use the right panniers.
If you’ve ever been on a mountain bike tour in the past, what are the lessons you learned from your time on the road? What things should the first-time mountain bike tourist know before he or she hits the trail? Leave a comment below and let me know what you think!
I take the general tone of your experience to have been negative. I hope you don’t discourage too many would-be off-road tourist from giving it a try. I’ve done a fair amount of fully-loaded off-road MTB touring with a front and rear set of Ortlieb Bike Packer Plus panniers. While I agree that the plastic bottom clip can occasionally pop loose, it is mostly a matter of adjustment so the clip reaches as far as possible across the support it clips to. The clips are somewhat flexible, so maximum interlock is prudent. (I’ve had a bungee-type bottom hook come loose on bumpy pavement before, too.) Regarding the very slow progress and occasional bike pushing, well, that’s just part of off-road, fully-loaded touring. Rather than targeting, say, 60+ miles as you might on pavement, it’s important to adjust the daily expectation when off-road. Depending on terrain, that can mean just 20-30 miles at times. But that doesn’t mean it’s not successful and fulfilling day! Both on- and off-road touring can be as challenging or as “leisurely” as you choose, and in my opinion each offers tremendous satisfaction. Either way, set appropriate expectations, and you’re in for a great tour!
i dissagree with the first of your 3 statements, to a certain degree. Your article seems to make the idea of breaking your loaded bicycle down into manageable components and carrying it, a bad, shameful or negative thing, when it is in fact, merely a solution to a problem,(how to reduce risk). If touring cyclists pack their gear only on the basis of reducing weight so they don,t have to push or carry any of it then they will start cutting corners by leaving behind essentials like tools, spares, first aid kits, etc, to reduce the load when off road touring can be harder and more damaging to rider and bike.. You have just rediscovered that the base idea of off road tours,,is to keep moving, and that the lowest gear ratio of all/any bicycle(s) when touring off road in difficult terrain situations,,,is to get off , walk beside it, and PUSH it.
You make a good point Laurie. Being able to carry your bicycle is a valuable part of the bicycle touring experience. You’ve reminded me on canoeists, who reach a waterfall, for example, and then have to carry their canoe and all of their gear down below the falls before they can continue on their way down the river. The same is true for bicycle touring I guess. It is nice to be able to pack up the bike and all the gear you are hauling and be able to carry it (for short distances at least) until you are able to load the bike back up and continue on your way.
I!:-) I´ve asked you about the influence of the direct suport aply, of racks&panniers, on the suspension with the Freeload Racks.
I´ve done some moutainbike touring in the past with my Trek4300(not a full suspension as you´ve just tried out) and the same bumping problems i had it. I´m using a hibrid bike(Specialized Crossroad) on my daily comuting to work and shopping, and also on my weekend road touring.
I became a true fan of BigWheels(29ers), and i´ve been planning on getting a fullsuspension29er…but i will certainly will not dispend(?put apart?) the touring capacity. So i´ve been also studying the way to solve the equation…
As i belive, to realy solve the bumping problem i´ll need to support the panniers way from suspension levers letting it free to workout (absorving bumps), so i think Topeak BeamRacks MTX (whith it´s TrunkBags) or even the Axiom´s Journey DLX Seatpost(whith anny kind of waterproof pannier) for the rear and a Tubus rack Swing for the front(also whith anny kind of waterproof front pannier) will solve it!
I´ll bee saving allready…!:-)
p.s. if you or annyone, has tried out this solution it would bee nice to report feedback, so i could bee more certain of my thinking! thanks annyway for the nice work you´ve been doing on bicycletouring info!
Hi Antonia, I’m not sure if I understand you fully, but I think you are asking if the Freeload racks will get rid of any possible bumps that the panniers experience while on the bike. Is that right? If that is your question, then I think the answer is “No”. In fact, I don’t think there are any racks out there that will 100% get rid of any bumps your bicycle takes while out on the road. The best way to protect your gear from the bumps of the road is to carry it on your back, but that isn’t something I recommend for long-distance touring.
Just like I said in this article, I think the Freeload racks are awesome for off-road touring adventures, but I think they are best paired with a set of panniers (like those made by Arkel or Lone Peak) that are specifically designed with mountain biking more in mind. That combination is going to give you the best possible handling and response when on the bike… but the panniers will still bounce around a bit if you hit a bump in the road. That, I think, cannot be avoided.
….I´ve also been thinking on getting a Bobgear Ibex trailer. Anything about it?…?
Hi Antonio. Here’s my review of the BOB Ibex bicycle trailer http://bicycletouringpro.com/bob-ibex-bicycle-trailer-an-in-depth-review/
I’m still playing with the Freeload racks, but now that I have had some experience with them, I’m actually super impressed. The racks are awesome, but like I said in the article, I know that on my next off-road bicycle touring adventure I am going to be carrying way less stuff. That was the major lesson I learned. The racks performed wonderfully under the load I gave them and they are definitely my go-to piece of gear for any off-road touring I do in the future.
Take a look at http://www.bikepacking.net and the personal setups page for ideas on how to tour off road.
4 full panniers and 3 cameras seems somewhat overloaded for off road MTB riding.
Look at what the guys doing the Tour Divide, CTR and AZT300 are riding with. A month unsupported, racing, eating, sleeping.
You don’t need 4 full panniers that’s for sure.
You are right Glennp. I would never actually do an off-road tour with 4 panniers or recommend it to anyone else. Like I said in the article, I wasn’t carrying the 4 panniers or the 3 cameras because I needed them, but because I was testing out the gear – just to see how it handled in these rough conditions. You are right. When traveling off road (and even on road), you want to be as light as possible.
I just bought the Freeload rack as it’s one of the few to fit a full suspension MTB (OMM Sherpa and only 1 other I’ve seen). I hope it’s as good as you say though it’ll only be carting a fairly light dry bag with bivi bag/tarp/down bag inside not panniers.
Ultralight bikepackers normally use a seat bag from Revelate/Carousel or bikepack.eu but this would snag on the back wheel of my bike at full suspension travel.
Can’t wait ’till the Freeload arrives!!!! 😉
Great site! Plenty of stuff to read on the dark winter nights.
It looks like I am far from civilization in this photo, but I’m actually very close to civilization. There were quite a few people on the mountaintop. Sometimes I lock the bike up and sometimes I don’t. In this case I felt like locking it.
Henry, they are called FREELOAD racks (although they are now being produced and sold by THULE). See here for more details http://bicycletouringpro.com/freeload-rack-review/
Hi Darren,
Thanks for the review, I found it very informative. I’ve got the same setup as you and am planning on doing a 2,600km solo tour through Italy. I’m not too sure my bike is good enough for this type of tour (Giant Trance x2) since she is quite high maintenance, but she’s all I’ve got (besides a good determination!). What are your thoughts?
I’m also very sceptical of leaving my bike outside of the tent when I sleep, I will probably buy a 2 person tent and sleep with it. Have you ever tried this before?
thanks
Ian
Ian, I don’t know how the Giant Trance would hold up on such a long tour. Do you have hydraulic brakes? That could be a problem on a long tour? But I think you could make it work.
As for sleeping outside with the bike, this is something you simply learn to do. I think sleeping with the bike inside your tent is silly. Just lock it up (close to your tent, if people are nearby)… or leave it outside, leaning against your tent (if there is no one around). It just depends on where you are in the world and what your campsite is like. I was nervous about leaving my bike unlocked at first, but once I realized no one was going to wander into the forest in the middle of the night to steal my bicycle, I learned to sleep soundly. Have a great tour!
Thanks for another great post. I’m curious as to whether the Giant pre or post dates your Co-Motion purchase. Did you find that you needed a more MTB-specific bike for your new style of touring? Cheers, Dan
I bought the Giant long before I purchased my Co-Motion Pangea. This Giant is not intended for touring at all really. I bought it for mountain biking… and only used it once or twice for mountain bike touring.
I would not use this Giant on a long bicycle tour. I would use my more dedicated touring bicycle instead (in all likelihood): http://bicycletouringpro.com/co-motion-pangea-review/
Some of this seems to imply that if one piece of equipment is not best for the conditions, you should buy something new that is. Take, for example, panniers that hang from hooks that go over the racks. You hit a bump or a crack or some obstruction in your road and they go flying off and skidding along the pavement or trail or wherever. What is the answer to this problem? Buy new panniers? I do not think so. It is very easy and inexpensive to eliminate that problem with small modifications that anyone can do without any tools at all. I should know. I have bicycle and camp toured about 37,000 miles through 19 countries, and have done exactly that.
Yes, you can either buy new products that work better… or fix the products you have to work better. Of course!