
Packing For A Bicycle Tour: Everything You Need To Know
Feb
You want to travel the world by bike, but you’re unsure about WHAT to pack… and HOW exactly you should pack it all on your bicycle.
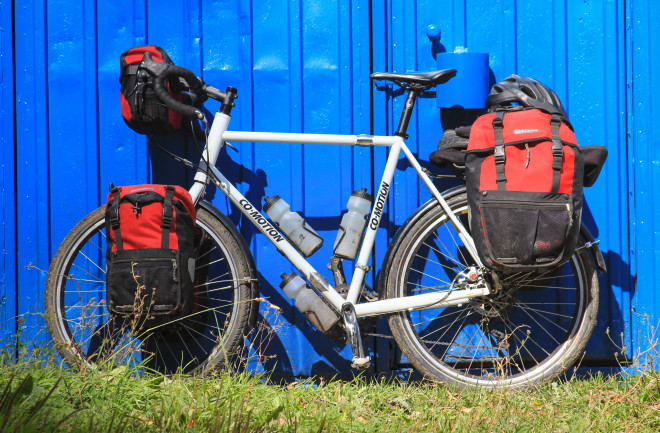
In this article I will demonstrate to you how I pack my current touring bicycle (a Co-Motion Pangea), my four Ortlieb panniers and my single Ortlieb handlebar bag. Inside the bags that hang off my bike are everything I need to survive for months at a time – as you will see in just a moment.
It should be noted, however, that this is just ONE WAY of packing your belongings for a long-distance bicycle touring adventure. WHAT items you choose to pack and HOW you choose to store your particular belongings is going to depend on:
- Where you are going in the world
- What the road conditions are like in that area (paved roads vs. dirt/mud/ice/snow)
- How long you are going to be traveling (a couple days vs. several weeks or months)
- Where you will be sleeping at night (camping vs. staying in hotels)
- Personal preference
- And a number of other factors (which I lay out in further detail inside The Bicycle Traveler’s Blueprint)
In the video above and in the notes below, you are seeing the way I have chosen to pack for my current 13+ month bicycle tour across Europe and Africa. What you pack for your own bicycle touring adventure and how you choose to pack your belongings on your bike may vary greatly. However, there are a few points worth noting in the video above, so no matter where you plan to travel with your bike in the world or how long you plan to be on the road, you are sure to gain an important piece of information from this article.
Gear Selection (What To Pack & What To Leave At Home)
A detailed breakdown of everything I’m currently carrying with me on my bicycle can be accessed in this article: What to Pack for a Year-Long Bicycle Tour. If you are wondering what sleeping pad I use or which type of cameras I am traveling with, that article will tell you everything you need to know.
The important thing to note in this video is that I am carrying a lot of electronic items with me – way more electronics than the average bicycle traveler will (or probably should) carry with him.
The reason I’m carrying so many electronics is because 1) I work while I travel. This is how I am able to stay on the road for so long. Instead of saving up a bunch of money working a 9-5 job and then getting a bunch of time off work to burn through my savings while I travel around the world (as many people choose to do it), I work and travel at the same time. Because I have a job that allows me to work from anywhere in the world so long as I have access to the Internet, I can actually make money while bicycle touring across the globe. But working while I travel also means that I have to carry everything I need for my work with me. In this case, it means carrying a laptop, two external hard drives, two to three cameras, a tripod, solar charger and a whole lot more.
The other reason I have so many electronics is because 2) these electronic items help me stay connected with my friends and family back home. When you travel for such a long period of time (several months), being able to communicate with those closest to you on a regular basis makes the loneliness and boredom that frequently are associated with long-term travel that much easier to cope with. So I carry a few items (like my iPod) that are largely unnecessary, but I use them to stay sane – by listening to music, playing games, calling (via Skype) my friends and family back home, etc.
If you are planning a long-distance bicycle tour, I do not recommend you carry as many electronics as I am currently carrying. If you can get by with just a cell/smart phone and a point and shoot camera, then that’s probably all you need. Plus, you’ll be happy to be not carrying all the weight that I currently am. Trust me, packing light is a huge advantage when traveling long distances by bike. Don’t follow my example here. Pack as little as you can, while at the same time carrying everything you need for your particular tour.
Because I am carrying so many electronics on my bike, it means I had to make a few sacrifices in other areas – namely in the amount of gear I carry for cooking. On most of my bike tours in the past I have carried a small, one-burner camp stove and titanium pot/lid with me so that I could cook my own warm meals when I was out on the road. But because I need to carry a laptop, two+ cameras and a whole host of other work related items with me at the moment, I chose to leave the camp stove at home on this particular tour. By doing so, it has required me to eat cold picnic style meals on most days, while occasionally stopping for a warm meal at a restaurant or cafe whenever I can. To supplement my lack of a camp stove, I also rent the occasional apartment during my travels and use the supplied kitchenette to cook myself some rice, vegetables, pasta and other such warm meals on a full size stove.
Carrying a camp stove is a traditional thing to do when conducting a long-distance bicycle tour, but it is one of those things that you don’t really need in many of parts of the world (such as Europe) where warm food and delicious meals can be found around nearly every bend in the road. If you’re looking for a way to eliminate even more weight from your touring bicycle, consider ditching your camp stove, fuel and cook pot and instead commit yourself to eating picnic lunches and warm meals in restaurants every night. (Again, this can’t be done in every part of the world, but for many bicycle travelers this can easily be accomplished.)
Packing Your Handlebar Bag
The video above explains just about everything you need to know about what I’ve packed in my bicycle’s handlebar bag. What the video doesn’t mention, however, is that the items I’ve chosen to carry in my handlebar bag are the items I need to access most frequently when I am either on my bike during the day or in my tent at night. This is why my iPod (used for navigation and entertainment), camera(s), headlamp, and wallet are all carried in my handlebar bag.
In the video you will also see that I am carrying a set of keys tied to a small lanyard inside my handlebar bag. These are spare keys for my bike lock, just in case I were to lose the key that goes with the lock itself, I would have a spare key hidden inside my handlebar bag (which I carry with me everywhere when I am off the bike), so I could unlock my bicycle in the event of misplacing the other key. I have locked my bike up before and then realized I did not have the key with me, so I’m trying to avoid making this mistake again by simply carrying a backup key.
On the sides of my Ortlieb handlebar bag are two small mesh pockets, which I use to store my multi-tool, patch kit, tire levels, lighter, chap stick and a few spare rack screws. Ideally I would carry these items in a rear pannier (or somewhere kind of out of the way) because I rarely ever use them, but all of these items are rather small and easy to lose inside my giant panniers, so even though they are kind of out of place when stored in my handlebar bag, they are safe, protected, and easy to find whenever I need to access them. Small items like this are best stored in small pockets or bags of some kind so they don’t get lost and are easy to access when you need them.
For more information on handlebar bags, please refer to the following articles:
Notes On How To Pack Your Panniers
Over the years I have written dozens of articles about how to pack your panniers. The article I wrote for the Adventure Cycling Associate titled “7 Secrets To Successfully Packing Your Panniers“, however, is probably one of the best guides I have ever produced to packing your panniers for a long-distance bike tour. In addition to that one article, I recommend you read:
- How To Pack Your Panniers (the first article I ever wrote on the subject)
- How To Pack Your Panniers: An Inside Look
The most important notes to consider after watching the video above are:
I always put everything back in the same place each and every time I pack up my bicycle. This allows me to quickly and easily access items without having to constantly dig through all four panniers to find the item I am looking for. If you store your belongings in the same place inside your panniers, you will save yourself a massive amount of time (and a number of annoying headaches) once you get out on the road.
Heavier (less frequently accessed items) should be stored near the bottom of your panniers, while lighter (more frequently accessed items) should be stored near the top. Keeping your weight as low to the ground as possible is important for controlling your bicycle at high speeds and for simply keeping your bicycle in good working condition – as I explain in great detail inside the 7 Secrets to Successfully Packing Your Panniers.
In the video above I also mention that I am carrying a pant leg protector. A pant leg protector is a simple fabric and Velcro strap that wraps around your right pant leg when you are riding your bicycle in long pants and it prevents your pant leg from getting caught in your bicycle’s drive-train. If you a touring in the summer (and wearing shorts every day) then you don’t need a pant leg protector. I am carrying a pant leg protector in this video because I am touring in both summer and winter conditions. Therefore, I knew in advance that I would be wearing shorts during the hot months of summer and would be wearing long pants during the winter (and that I would therefore need to also pack a pant leg protector for my wintertime exploits).
Another point worth mentioning when packing your panniers is that you need to always leave some extra room inside your panniers for food and other items you might choose to pick up along the way. If you leave home and your panniers are packed to the gills, but you haven’t left any room to carry any food, you are carrying way too much stuff. You need to leave some extra room in your panniers for food. I recommend having at least half a pannier’s worth of space dedicated to storing food (this space can be spread out across all of your panniers – as I have done in this video). It may look like the panniers in this video are fully packed, but there is actually about 1/4 of each pannier that is empty and can be used to store a small amount of food.
In my left rear pannier I store all of my camping equipment. Many bicycle travelers will store these items on the top of their rear rack, but I like to carry them inside my panniers so they are protected from the elements (sun and rain/snow/etc) and also so I don’t have to worry about these items falling off the back of my bike at some random point during the day. With these items stored inside a single pannier they are easy to access at the end of the day and easy to pack up again in the morning.
If, however, my tent gets wet at night and it is still wet in the morning when I pack it up again, I usually don’t want to put it in the same pannier as my sleeping bag, because my sleeping bag might get wet and that would make the following night’s sleep a terrible, terrible experience. So if my tent gets wet, that’s when I do resort to bungee cording it to the rear rack of my bicycle – at least until it dries out. After the tent has dried, I place it back inside my rear pannier with all the rest of my camping gear… and then I continue on my way.
In the video above I also point out that I store my bicycle’s chain lube in the small mesh pocket on the outside of my left rear pannier. I mention that I keep it here so it is easy to access, but mainly because if the bottle of lube were to open, it wouldn’t spill all over my belongings inside my panniers. This is an important point to make, not just when referring to chain lube, but to any liquid item that you store inside your panniers.
I make a special point never to store liquids (or anything sticky, squishy, etc) inside panniers that contain electronic items or anything of major importance to me (in the wintertime, this would mean clothing – because if you get your clothes wet in the winter, you are screwed!). So be careful what you put in your panniers. If you put a bottle of orange juice in the same pannier as your laptop, for example, and that bottle or orange juice starts to drip at some point during your ride, you might discover that you’ve totally ruined your laptop at the end of the day. Don’t make that mistake! Pack liquids on the outside of your panniers or, at the very least, away from items that can not be easily dried out at the end of the day.
My right rear pannier (shown in great detail in the video above) is my “work pannier.” This is the bag where I store my computer, external hard drives, backpack, and a number of other personal items. This entire pannier contains items that most bicycle travelers will never need or want to carry. I do not recommend you carry most (or any) of these things. If you are a normal bicycle traveler conducting a traditional bicycle tour, you might replace everything you see in my rear right pannier with a simple camp stove and pot and then use the rest of the space to store food and other personal items.
I’m also carrying two different set of shoes in the video above (one set of shoes to cycle in and another pair of shoes to walk around in). Many bicycle travelers will carry only one pair of shoes (a pair of shoes that doubles as both a walking and a cycling shoe). However, when you are traveling for months on end, you tend to do just as much walking as you do cycling, so it becomes increasingly more important to have a good pair of walking shoes on a long-distance tour.
In fact, many long-distance cyclists choose to get rid of their cycling shoes altogether and opt for a simple pair of walking shoes instead (making sure that the walking shoes can also be used on the bike as well). The goal for many long-distance bicycle travelers is not speed or even efficiently, so giving up a dedicated pair of cycling shoes for more off the bike comfort is a perfectly fine move to make in some instances.
You will also see that I am carrying a small backpack with me inside my rear right pannier. In my early days of bicycle touring I never carried a backpack with me. Instead, if I wanted to carry a few belongings with me, I simply used my handlebar bag or one of my small front panniers as a sort of large purse that I would have to carry around with me in my hand. But using a handlebar bag or a pannier to carry your belongings around a large city, for example, for months on end is not a fun way to travel. So I again opted to take a non-traditional approach to bicycle touring and packed a lightweight backpack inside one of my rear panniers. Frankly, I can not imagine traveling for more than a year without a backpack. I walk around large cities with it (using it to carry my large SLR camera and tripod, as well as my rain jacket, water, wallet and other personal items) and I also use it on a regular basis to carry food and drinks from local supermarkets back to my hotel, campsite or apartment.
Under ideal circumstances it would be great to have a pannier that doubled as a stylish and super functional backpack. In fact, there are many backpack/pannier combo products that exist. I’ve reviewed a few of them here on this website:
However, none of the products I’ve experimented with are things I would actually ever use on a long-distance bicycle tour (the Lone Peak backpack/pannier isn’t waterproof and the Scion TransAlp panniers are too small.
Once again, carrying a backpack is not a bicycle touring necessity, but in some instances it is a nice thing to have.
Packing Up The Bike – Same Way Every Time
Finally, after the handlebar bag and panniers are packed, I place the bags back on my bicycle. It should be noted that I place the items on my bicycle in the exact same order almost every time I pack up my bike. The bungee cord is run through the straps on the back of the solar panel and the bungee cord is then attached to the rear rack. Then the two rear panniers go on (I do them first because placing the front panniers on first tends to make the bicycle difficult to balance). Then the bag containing my tripod and tent poles slides in underneath the bungee cord on the rear rack. Once the rear end of my bike is secured, I move to the front. I place on the two front panniers and then lock the handlebar bag in position.
Before cycling off, I look the bike over really quick, double-checking that all the panniers are properly secured to the racks, making sure that none of the straps from the panniers are hanging into my spokes or drive-train, looking to make sure I haven’t left anything on the ground in the area, and then I pedal off!
If you have questions about how to pack your bicycle for a long-distance bicycle tour, be sure you pick up a copy of my wildly popular book, “The Bicycle Traveler’s Blueprint: The Definitive Guide To Self-Supported Bicycle Touring.” Or leave a comment below and I will respond just as soon as I possibly can!
Hello Darren, Thank you so much for all that good info that you relay to us. I’m 65 and just starting out as a cyclist. I can no longer ride the traditional upright style due to my arthritis in my shoulders ,hands and wrists. I sold my car and purchased a tricycle recumbent (HP Velotechnik, scorpion fx). I feel that I still have a life to live now that I can ride again. Do you have any experiences with people that tour with these types machines? I’m very slow, but when I get there I feel great with absolutely no pain. I think that it would be very helpful and instrumental to here about folks that tour with the recumbents also. Please let us know what your thoughts are or recommendations that may be beneficial. GOD bless you and all that you do.
Rich
Hi Rich, I am familiar with recumbent bicycles and know that many people suffering with back, neck and knee problems use them (and like them). However, I personally have never used a recumbent bicycle and really don’t know much about them. Sorry.
Maybe I should use a recumbent on one of my future bicycle tours? I think that would be fun (and different)!
This is a great article, Darren! Nice music in there, too. Fun travels!
Thank You for the video . . I am trying to get things in order for touring I have a bike(Motobecane Gran Turismo), front and rear panniers(about 70 liters worth), fenders, 35 mm tires, and 3 water bottle cages I even put the Nitto Noodle B-177 handlebar with 105 bifters. Low gear 28/34 . . I weigh 260 lbs and with gear I can weigh out at 350 or more pounds. That was a two year project to get to this point.
You may want to know if i am bragging or complaining
Nice informative videoi, keep up the good work.
Hi Darren,
I just wondered , what sort of riding pants do we wear on long trips? Is it the regular lycra – padded pants or any other types? . thank you for all the valuable information here and hoping to ride in the north of thailand.
By the way i too am in my 65th year and still feel like life’s great still great.
I personally do not ride in traditional spandex/Lycra bicycle shorts. This is a personal choice. I just don’t like them. Instead, I ride in something more like a mountain bike short. Some of my favorites are from Fox Racing.
Hi Darren,
Unless I’m mistaken, you don’t appear to pack an emergency first aid kit, is there any particular reason for that ?
Paul
You’re right Paul. I’m not carrying a first aid kit. This is a personal choice (and not necessarily something I recommend). I don’t carry a first aid kit because I have never in my life used a first aid kit for anything (either on or off the bike) and so I consider it a waste to carry such a thing on a bike tour. If you know how to use a first aid kid and actually use that sort of thing in your daily life, then it might be something you want to bring with you. I carried a first aid kit on my first several bike tours, but never used it, so I haven’t carried one for the last 10 years… and I’ve never needed it in 12+ years of bicycle touring and 29+ years of life.
Hi Darren,
I enjoyed your latest video and envy your travels. I am a recumbent trike rider and completed a three month, 4000 mile ride this past summer. I find that many of your travel tips cross over to recumbent adventures, so keep them coming. Your tips on packing keep me much lighter then I normally would be. I use a trailer most of the time, but will be using panniers on my trike next year on a 900 mile ride through England, Scotland and Wales…hope I can keep the weight down.
Thanks, Pat
Rich,
To answer your question, I have read and heard nothing but GREAT things about recumbent trike touring. I myself, have a trike that I have been bikepacking (basically, a shorter version of touring) with and I love it! When packed correctly, having cargo on a recumbent trike is hardly ever noticed while riding, and with how relaxed your body is, you could go for miles without thinking twice! I recommend going to a local rail to trail and giving it a try!
Darren,
I was wondering about how you feel about your Bike-Packer panniers. When I joined your site, I noticed you had them (actually, I stumbled upon this site from a Google search about the panniers) and used them for your long tours. I would love to know how they hold up for you and your needs during a tour. Thank you for all of the information! Your site has been more than helpful with my preparations for my upcoming bikepacking trips! Thank you.
I’m working on a long detailed review of the Ortlieb Bike-packer and Sport-Packer panniers. In the meantime, however, I love them. I’ve used dozens of different panniers… and Ortliebs are definitely my favorites.
Hi Darren,
I see you use a solar panel. Have you used dynamo hubs in the past? What do you make of them? Are they worth the extra weight?
Serge, I’ve never used a dynamo hub, so I don’t have anything to really say about them. I’m hoping I can use a dynamo on one of my future tours so I can try it out and see how well it functions.
That was great! It’s neat to see those nitty-gritty details because they give a much better idea of life on the road than just “hey, I have 4 panniers for all my stuff”. Thanks for the detailed tour. The soundtrack was nice & relaxing, too. 😉
Thanks for the tips! We are looking forward to getting started on our tandem recumbent from Canada to Chile
You are right, …. from some experience that I have compared my journey, from it I get a shortage of equipment should I bring. And I took some tips from your experience writing earlier that you have sent me.
thank you
ENJOYED THE INFORMATION VERY MUCH; AGREE AND WELCOME THE POINT TO DO EVERYTHING THE SAME WAY EACH TIME. ON THE ROAD, IN A PINCH, IT HELPS TO KNOW WHICH BAG TO GO TO FOR CERTAIN ITEMS. I NOTICED YOU DO NOT CARRY RAIN COVERS FOR YOUR PANNIERS; WAS THAT A OVER-SITE OR IS THERE A REASON? IN YOUR CLOSING SCENE YOUR RIDING BUDDY HAS THEM ON ALL CORNERS. WHEN USING THE ‘GO-PRO’ HOW DO YOU KNOW WHERE IT IS POINTED AND WHAT IT IS SHOOTING? DO YOU — USE IT ON YOUR HELMET OR ELSEWHERE?
Pete,
I don’t have rain covers on my panniers because my panniers are waterproof. No extra rain covers needed. This is one of the major advantages to Ortlieb panniers (compared to some other bicycle touring pannier brands). My friend, Brandon, has Lone Peak panniers, which are nor waterproof, and this is why he has to carry an extra set of rain covers.
As for the GoPro, you typically do not know exactly what you are shooting. I have the LCD screen on the back of my camera, but depending on the type of shot you are doing, even that doesn’t help. You just learn (with time) where the camera is shooting and whether or not you are getting what you want in the shot. It takes a lot of experimentation.
What a great series of articles you wrote, very well thought out with a lot of good useful information. Thanks for doing all that work.
I’ve been wondering myself about taking a stove and items used with it and just go cold meals. Though my touring will be done in America, I still ponder the idea of the stove in case I need to boil water to drink from a lake, river, or stream, and I hate the taste of iodine. I am aware of the claims of small water bottle size filtration systems but not so sure how effective they really are. And also I may stay an extra day as some campsite and may need or want to cook some food.
I’m not into electronics, I have the typical bike computer, small radio with weather stations, and cell phone and that’s it. A cheap small solar recharger can keep the phone charged. and the radio will last for months on a set of batteries. Though if prices come down I may look into a GPS mapping system, currently the bike specific GPS units are expensive, paper maps are just fine for what I do now.
I’ve been riding for 40 plus years and never carried a first aid kit; besides a serious cycling accident is either going to leave you in a position of being unable to take care of yourself, or such a serious wound that no small first aid kit that can fit on a bike is going to be able to handle.
I store my chain lube first inside a plastic bag first then in the pannier side pocket. Bottles of lube can have the tendency to seep oil which isn’t helpful if it gets on the pannier fabric, clothes, or whatever oil can get on that may damage the item or items.
Do you need any kind of permission/authorisation when you enter a different country?
It depends on where you are from in the world and where you are going. A passport is essential, but visas will be required in some instances. But again, it just depends on where you are from and where you hope to go. The rules are different for every person and every trip.
David, I suggest you check out the Companions Wanted section on the Adventure Cycling website: https://www.adventurecycling.org/adventure-cyclist/companions-wanted/ There will surely be some people passing through your area that you could contact and join for a part of their journey.