
How To Make Your Own Working Camp Stove
Jul
Finding the right stove for your bicycle tour can be difficult. There are dozens of different stoves to choose from and it seems as though each one requires a different type of fuel. That’s why, years ago, when I came across the designs for a working camp stove made out of two ordinary soda cans, I knew I had stumbled upon something special.
Today, I have a short video for you where I am going to show you how to make your own working camp stove – perfect for your upcoming bicycle adventure. The best part about this stove is that its lightweight, easy to use, and runs off denatured alcohol (which can be found just about anywhere in the world).
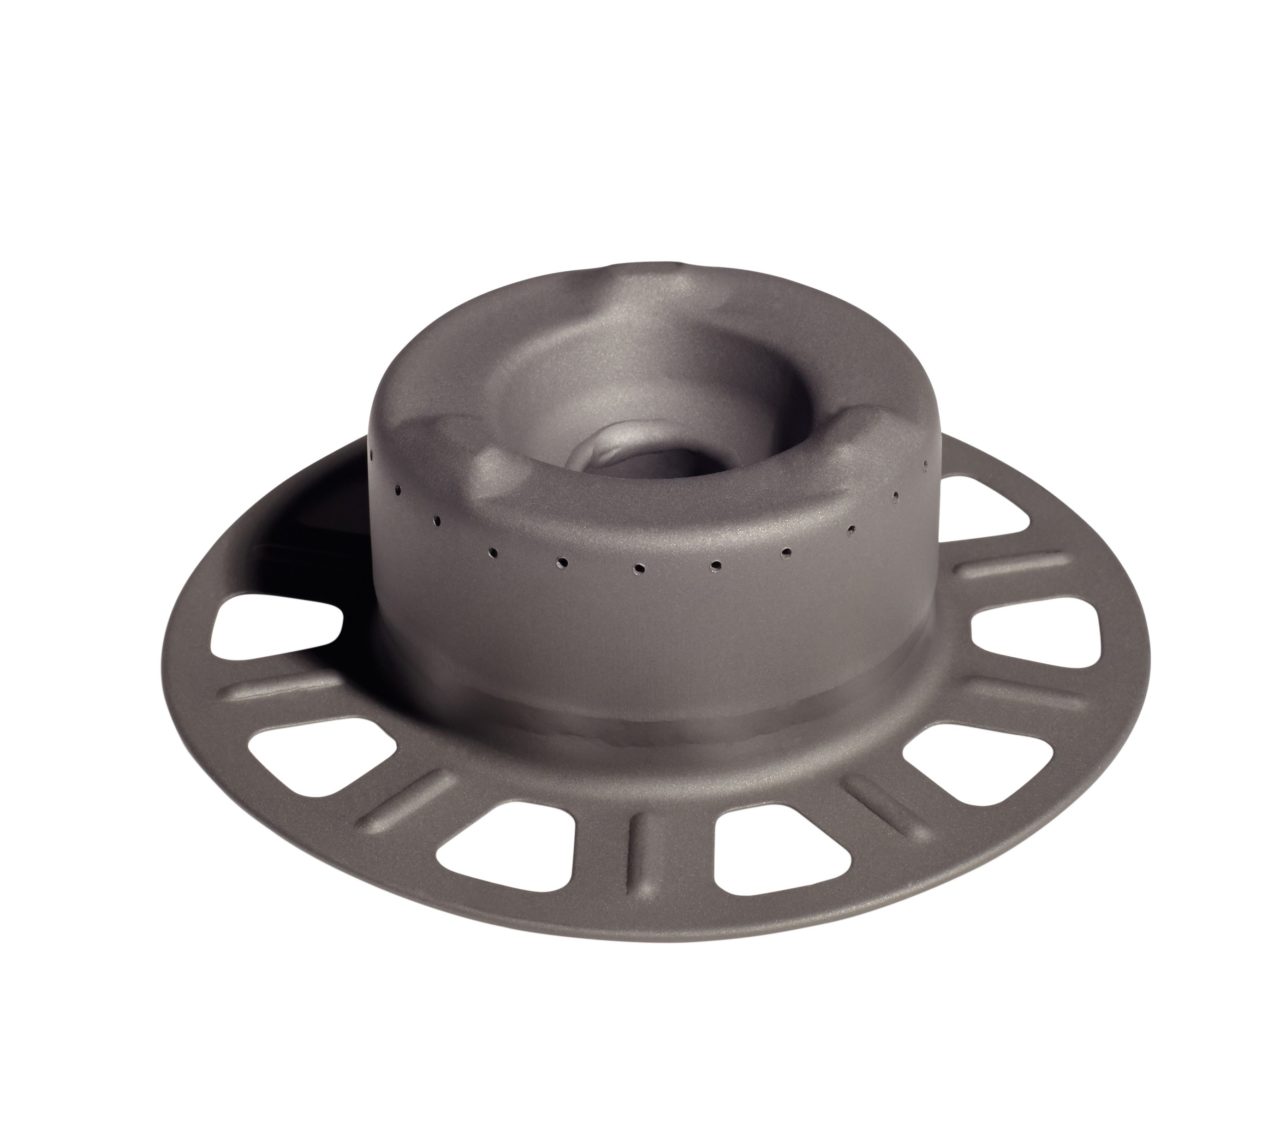
Pour a very small amount into the center hole and light with a match. After a few seconds the fuel will disperse to the burner holes and you’ll be ready to cook!
Once the stove is lit, place a small pile of rocks around the stove and then place your cook pot on top of the rocks. Now you’re cooking!
Experiment with the amount of fuel it takes to bring water to a boil. Start with a single teaspoon, see how long the fuel lasts, and then work your way up from there. The more fuel you pour into your stove, the longer the flame is going to last. After a few minutes of experimentation, you will begin to discover just how much fuel you need to cook whatever meal it is you are trying to prepare. Be sure not to pour too much fuel into the stove, as the only good way to remove the fuel from the stove after each use is to let it burn itself out entirely.
After the fuel has burnt itself out, be sure not to touch the stove for several minutes. The aluminum remains hot for a quite a while after use. Do not burn yourself!
Have fun, and stay safe!
Actually, you could “snuff” this out. Maybe get another can bottom to put over the stove while it’s cooking, and wait a few seconds while it starves for air. Granted, yet another something to carry, but you can put matches into it and stuff. 🙂
Also, I just saw a camp stove that works identically to this today. It’s called the “Trangia West Wind Stove” and seems to be Swedish. It’s close enough that I wonder which came first? The can stove or the Trangia? My bet is on the can. 🙂
-Jon
This is so cool Darren…
I plan on making one for myself….
Thanks
Rick
What a great idea, especially for those of us who are frugal. Thanks!
Great tutorial!! I succeeded on my second attempt and can’t wait to get some fuel to try it out. I have one observation of my own, though.. I used a regular 12oz soda can and I had to modify one of the measurements you mentioned. I made the slits on the inner portion 170mm apart, as it fit more snug than 150mm.
Otherwise, all went well and thank you for again for the video!
Happy riding!
–Shelly
I tried it and it burned from the middle, but could not get it to come up through the holes. I could not get water to boil. The water never really got hot.
Ditto. I built it, but just burns from the middle. Any advice?
King Rob and Max, I have three suggestions.
1) Try making the three holes on the inner portion of the stove a bit taller. They may not be tall enough to allow the fuel into the section where the burner holes are located.
2) Also, make sure that the inner portion of the stove fits well around the bottom of the soda can. If the inner portion of the stove is too loose, the fuel won’t dispel properly.
3) Finally, try using a different type of fuel. I have found that rubbing alcohol (70% concentration) doesn’t work nearly as well as other types of fuel (such as HEET). With rubbing alcohol, you may have to wait as long as 3-5 minutes before the fuel starts to come out of the burner holes.
I hope this helps!
Hey Darren am not far off doing my first trek on my bike through the south island of New Zealend. 700 km in two weeks. Made one of your awesome stoves in about 20 min. Works a treat. I did make one small mod you might be interested in. Instead of sloting the inner ring together I cut it a little wide (a bit over 40mm) and then trimmed to sides down leaving to ears protruding at one end of the flat strip. After I had rolled it into a tube I simply bent the ears over and presto it was done. The advantage is that you can easily adjust the sides to make a perfect fit. Then I cut one of the slots in the bottom through the overlapped section and bent them up together to form the hole and stop the inner ring from sliding apart. Just a variation on a theme but it dispenses with the heatproof tape
Hi Darren. Indeed, that’s the best solution for a lightweight pack. There are some different models around the web, the easier to make with a good performance is the PASS – Plain And Simple Stove, actually a soda can cut in half with some holes punched in it:
https://www.kruegerservices.com/fritz/osp/gss-main.html
You can see some comparative experimental data (time to boil water, burn time) between the PASS, the stove featured by you and some other models here:
https://www.kruegerservices.com/fritz/osp/perf-data.html
For the ease of building and better performance, it’s worth a try.
This stove is great!
I would like to suggest that maybe the instructions be typed out, for those people who want to print it out as a reference, or for those who want to avoid having to watch the video every time they want to make one of these things.
Awesome! Many thanks man!!
These stoves work very well. Check them out at zenstoves.net