
How To Pack & Carry a Drone on Your Bicycle
Apr
In this short video you will learn how to pack and carry a drone on your bicycle.
Personal drones are becoming more and more popular, and one of the many uses of a camera drone (like the DJI Phantom 4 Quadcopter) is to document your bike rides in a unique and thrilling format. From the air, your cycling adventures take on a totally new feel and highlight the area you are cycling through. Plus, a flying camera drone gives you a perspective of your surroundings that you simply can not achieve when shooting on the ground.
The perspectives you are able to obtain from the air, and the fact that technology has advanced so quickly, is why drone photography has become so popular in recent years. It’s also why so many cyclists (myself included) have started carrying drones with them on their bicycle touring adventures all around the world.
For the last year or so, I have traveled across 9 different countries in North America, South America and Europe on my bicycle, while at the same time carrying a DJI Phantom 4 drone around with me to document my travels. If you’ve watched any of my recent videos on the Bicycle Touring Pro YouTube channel, you know that the results of this effort have been pretty spectacular.
While smaller, lighter drones now exist (like the DJI Mavic Pro), the DJI Phantom 4 was the smallest drone I could find at the time I bought it in early 2016. The drone was just small enough, in fact, that I could pack it inside one of my bicycle’s rear panniers and carry it with me on my travels around the world… which is exactly what I ended up doing.
Watch the video above and you’ll see how I managed to pack and carry a high-quality camera drone on my bicycle.
Step 1: Make Sure You Have Everything You Need
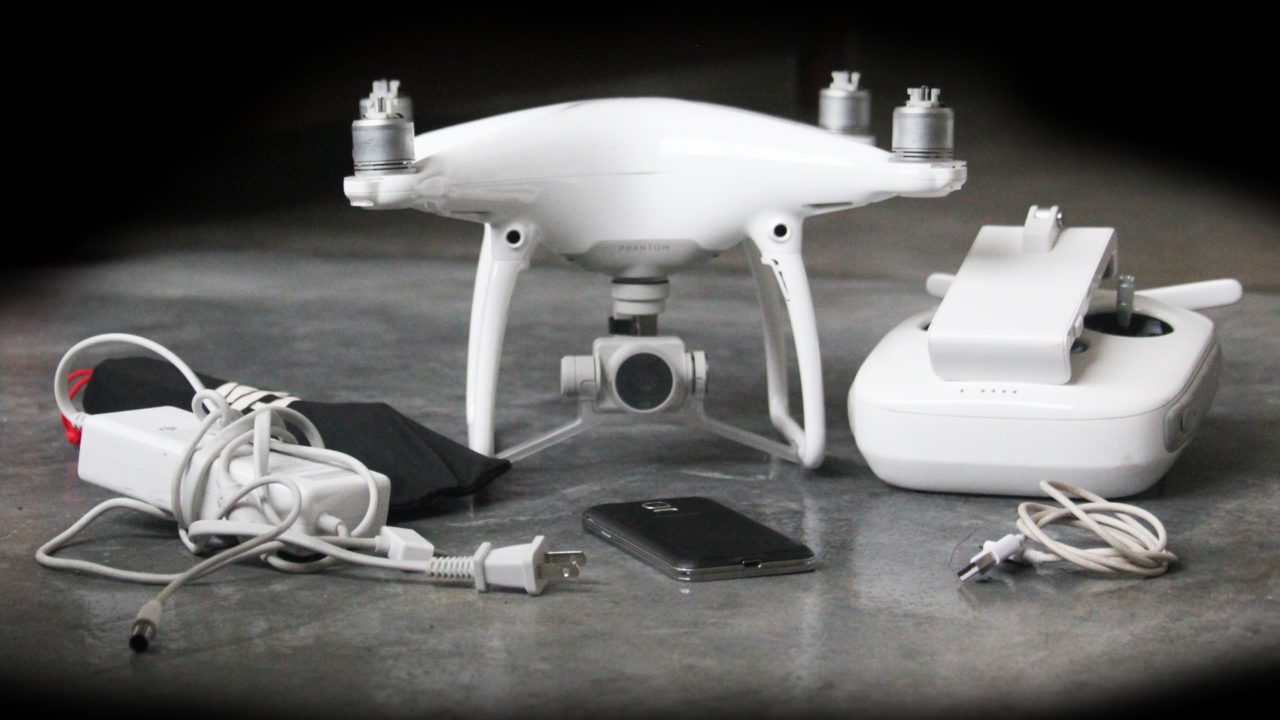
The first thing you want to do is make sure you have all the various parts you are going to need to fly your drone once you get out there on the road.
- Drone
- Micro SD Card
- Gimbal Brace
- Propellers (and spare propellers)
- Remote Controller
- Battery Charger
- USB Cable
- Smartphone
- 4 Rubber Furniture/Stool Caps
- Spare Batteries
Leave any one of these various parts at home and you probably won’t be able to fly your drone one you get out there on the road. I’ve gone on several bike rides with my drone, only to realize once I got into the field that I left my USB cable or smartphone at home. Whoops! Don’t make that mistake with your own cycling adventures.
Step 2: Charge & Install the Battery
Before you take off on any drone/cycling adventure, you want to make sure the battery for your drone and remote controller is fully charged. I personally traveled with only a single battery for my drone (because batteries for the DJI Phantom 4 are both heavy and expensive), but if you have more than one battery, make sure your batteries are topped off before leaving home.
Then, install the battery in the drone. After more than a year of cycling with the drone on my bicycle, I found there to be no problem cycling around with the drone battery installed in the drone. If you are worried about it, however, you might choose to carry the battery separate from the drone itself. I wanted to keep the drone and the battery together, however, so as to not lose the battery at any point during my travels, so I found that keeping the battery in the drone was the best and easiest option.
Step 3: Secure the Camera/Gimbal
If you are going to carry a drone on your bicycle, it’s very important that the drone’s camera gimbal be locked in place with the included gimbal guard that comes with your drone. You don’t want the camera/gimbal to be bouncing around as you ride your bike, as this could cause damage to the drone, camera or gimbal. It’s very important that you not only lock the camera/gimbal in place each time you pack the drone for your bicycle, but it’s also extremely important that you not lose or break the gimbal guard once you get out there on the road.
Step 4: Protect the Motors with Rubber Caps
When you buy a DJI Phantom 4 or similarly sized drone, it usually comes in some sort of lightweight Styrofoam carrying case. But that case is simply too large to carry on the back of a bicycle. This means carrying the drone in some other way – and the way I chose to do it was by packing the drone inside a large, waterproof bicycle pannier that was attached to the rear rack of my bicycle.
Before I could place the drone inside that large waterproof bicycle pannier, however, I wanted to make sure that the drone was fully-protected from the bumps and vibrations that I knew it would have to endure once it was being carried on the back of my bicycle. And after looking at the drone for only a few moments, I realized that the four small motors at the top of the drone were going to be some of the most susceptible parts to break or be damaged during transport. And this is why I went out of my way to find some means of protecting those motors while the drone was packed inside the pannier on the back of my bicycle.
The solution to this problem cost me only $2.99 USD. I went to my local hardware store and found four rubber furniture caps (which are meant to be used on the bottom of chairs or stools to prevent the chairs/stools from scratching your floors). I then placed these four rubber furniture caps over the top of each of the drone’s four motors. Unbelievably, the rubber furniture caps had the exact same diameter as the drone’s fragile motors. With the furniture caps in place, the drone’s four motors are protected from being snapped or broken off, and the drone as a whole can now be safely placed inside your large waterproof pannier bag.
Step 5: Place the Drone In a Waterproof Pannier
A bicycle pannier is a small, backpack-sized back that attaches with a series of hooks to the front or rear rack on your bicycle. Panniers come in a number of different shapes and sizes, but if you want to carry a DJI Phantom 4 drone (or something similar) on your bicycle, you’re going to need one of the largest bicycle panniers you can find.
I use an Ortlieb Bike-Packer Plus waterproof bicycle pannier… and it is the perfect size for carrying the DJI Phantom 4. The drone slides into the pannier as through the two products were made for one another. If you’re carrying a DJI Phantom 4 or any similarly-sized drone, then I can’t recommend the Ortlieb Bike-Packer Plus panniers enough. Panniers are usually sold it sets of two, so if you buy this particular pannier set, you will receive one pannier to carry the drone in and another pannier to carry the rest of your belongings in on the opposite side of your bicycle.
As you slide the drone into the pannier, make sure the drone battery is facing up toward the sky and the camera is facing down toward the ground. If the drone is oriented in any other position, the battery will fall out of the drone as you are riding, as the bumps and vibrations from the road will force the battery from its compartment.
Step 6: Stuff Clothing into the Surrounding Spaces
Now that the drone is inside your bicycle’s rear pannier bag, stuff the areas surrounding the camera/gimbal and landing gear with soft clothing articles. T-shirts, socks, underwear and other fluffy items work well. These items will further protect your drone from the bumps and vibrations of the road.
Once you’ve got the areas near the bottom of the pannier bag stuffed with clothing, place at least once fluffy clothing item over the top of the drone. I like to use a fluffy fleece jacket for this purpose. After placing this particular clothing item over the top of the drone, you shouldn’t be able to see the drone anymore, but there should still be enough space inside the bicycle pannier that there is room for the drone’s propellers and remote controller.
Step 7: Position the Propellers Inside the Pannier
My drone came with two sets of propellers, and I recommend you bring both sets with you when you’re participating in a bicycle expedition of any kind. If you break even a single propeller and you don’t have any spares with you, your drone will be instantly out of commission and you’ll be forced to cycle around with the drone, despite being unable to use it. So, make sure you have at least a couple spare propellers with you when you’re cycling.
Then, place the propellers inside a lightweight drawstring bag. DJI provides you with such a bag when you purchase a drone from them, but it would be better if this drawstring bag were bright in color (i.e. red, orange or yellow) as the black bag they are currently using is easily misplaced. Be careful not to lose your propeller bag when you are packing and unpacking your drone.
You might even choose to carry two sets of propellers with you, but to store each set of props in a different location on your bicycle. That way, if you do lose one set of propellers, you still have a second set located in a different place on your bicycle that you can use as a backup.
When I place my drone propellers inside my pannier, I make sure to always place the propellers in the exact same spot, at the back and near the top of the pannier. That way I know exactly where the propellers are whenever I need to pack or unpack the drone. And if the propellers aren’t in that location for some reason, then I know I need to start freaking out (because I’ve probably lost them).
Step 8: Place the Remote Inside the Pannier
In step #6 I mentioned that you should place soft clothing items around the camera/gimbal and landing gear of the drone, and that at least one piece of clothing should be placed over the top of the drone inside your waterproof bicycle pannier. This last article of clothing at the top of your pannier bag is there to protect your drone from the remote controller, which you are going to place at the top of your pannier bag. This clothing article acts as a separating device to keep your drone and remote controller from rubbing against each other as you cycle.
When you place the remote controller and USB cable inside your bicycle pannier, place them on top of that last article of clothing, and be sure to position the remote controller’s antennae so that they are facing the back of your bicycle pannier (toward the side that has the hooks on it). This way, if your bicycle were to ever fall over on its side, there is much less chance of the antennae breaking off the remote during the crash from the fall.
Step 9: Carry The Battery Charger Elsewhere
While every other piece required to operate your drone is stored inside this one single pannier bag, the drone’s power charger should probably be stored somewhere else (probably in the pannier on the opposite side of your bike). The drone, propellers and remote are pretty heavy once you add them all up and place them all together inside one single pannier, so it’s best to even out the weight of your drone-carrying pannier bag with the weight of another pannier on the other side of your bike.
Place your drone’s battery charger inside a separate bicycle pannier and then pack that pannier with any other items you might need for your cycling adventure. Just make sure that each pannier is approximately the same weight as the other pannier. Weight management is very important for the overall longevity of your bicycle, as well as your ability to control the bike and ride safely (as I discuss in this article about how to pack and carry your items on a bicycle tour).
Step 10: Secure the Pannier to Your Bicycle & Ride
After your drone has been carefully packed inside a large, waterproof pannier, the only thing left to do is mount the pannier carrying your drone to your bicycle’s rear rack and start cycling!
As you ride, be careful of large bumps in the road and take extra caution when leaning your bicycle up against a fence or wall. While the drone will be able to handle the small bumps and vibrations that come from cycling on paved surfaces, you want to take extra precautions when riding off-road.
Be mindful of the fact that you are carrying a drone with you on your bicycle… and if necessary, adjust your riding style to protect the precious cargo you are carrying. This might mean getting off the bicycle and walking at times, or it may mean simply tackling an obstacle in the road in a slower, more methodical manner. Whatever the case, be careful! You’re carrying a drone on your bicycle now. You don’t want it to break!
If you have any questions about how to pack or carry a drone on your bicycle, please leave a comment below and I will happily respond just as soon as I have a chance.
product ad is good but come one.* ! Don’t block a bag for this. travel lite. use a foldable mini drone drone (like the Pocket selfie of Zerotech =350$). smaller, compact, quick to use.