
How To Take Incredible Bike Touring Photographs
Mar

The dream you likely have involves going on a bicycle tour and having magical experiences you will remember for the rest of your life. Experiences so incredible you will be telling your friends and family about them for years to come… and the photographs you capture from your travels will captivate every individual you choose to show them to. The reality, however, might be that you complete your bike tour as planned, but return home with hundreds of lackluster photos that no one but your cat is interested in looking at.
The truth is… this happens all the time! Even I am guilty of taking terrible bicycle touring photographs.
In 2009, for example, I spent 9 whole months riding my bicycle across Europe – from Switzerland to Greece. And while I was out there on the road, I took over 15,000 photographs! But when I returned home at the end of that long journey, I realized that for as many photos as I had taken, only a handful of the photos consisted of both me and my bicycle. I had made a horrible, horrible mistake! I had spent 9 months of my life biking across some of the most beautiful places in the world and I taken 14,990 photographs of beautiful landscapes and interesting buildings I had seen along my journey, but I only had about 10 pictures and me and my bike!
After that experience, I decided I was going to take my bike touring photography seriously and I promised to do my best to capture the spirit of my bicycle touring adventures in the photos that I took. The trick, I knew, would be to get photos of both me and my bicycle in the areas I was cycling through. And that, my friend, is the secret to a really good bicycle touring photo! Landscape shots and selfies are fine, but if you want a truly memorable bicycle touring photo, you need to get a picture of both you and your bicycle.
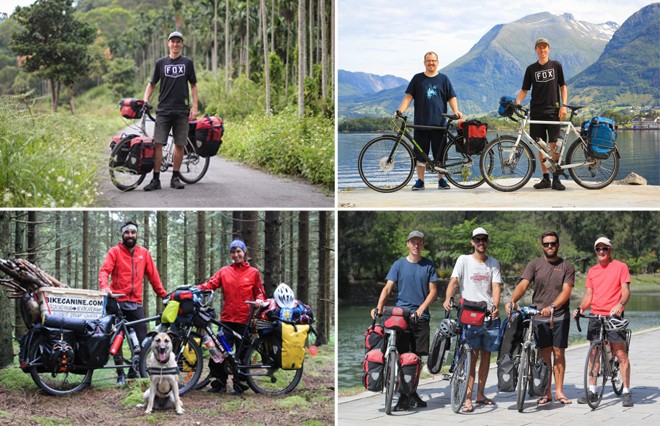
Standing With Your Bicycle

One of the easiest bike touring photographs to get is a shot of you standing in a stationary position with your bicycle at your side. You can have a friend, family member or complete stranger take these photos for you, or you can set your camera on a tripod (or other stationary object), set the timer, and then run into position. If you want your photos to really stand out, try taking these photos in an interesting location, with a scenic vista behind you, or a landscape that really captures the essence of the area you are cycling through. Also try experimenting with the angle of your bicycle. You can position your bike at a 90 degree angle, so the camera can see the side of your bike and everything you’re carrying on it (like you see in the top-right and bottom-left photos), you can angle your bike a little bit (like you see in the top-left photo) or you can point your bicycle straight toward the camera (like you see in the bottom-right photo).
Cycling Through A Scenic Landscape

Another easy cycling shot to get is where you aim your camera at a scenic landscape and then you simply cycle through the shot. This is a fast and easy way to turn a static landscape photo into a dynamic and stunning bicycle touring masterpiece. These types of photos are best captured by another individual who operates the camera for you – lining up the shot and then pressing the shutter as soon as you cycle into position. While these sorts of shots can be accomplished with a tripod and a timer, it’s difficult to do, as the best scenic landscape photos tend to be shot from far away and most camera timers don’t give you enough time to get you and your bicycle into position.
Biking Toward The Camera

A photo of your bike is nice, but a photo of your face is even better! Which is why you should always try and get at least one photo of you riding your bike straight toward the camera. These sorts of photos are best captured on uphill ascents, but can be taken on any type of terrain by a skilled photographer. Simply cycle toward the camera and smile, grimace, or (better yet) pretend that the camera isn’t there. Wide shots that show your bicycle and your full body are great for showing off the incredible scenery you find yourself cycling through, while close-ups are great for storytelling pain, fatigue and unadulterated joy.
The Dynamic 45° Angle Shot

While cycling straight toward the camera is a relatively easy photograph to get, it’s much more interesting if you can angle your bicycle and your body away from the camera just a little bit. An angle anywhere from 30-60 percent is ideal, as this angle will capture your full bicycle, your full body, and the landscape through which you happen to be riding. These photos can be taken by a friend, but can also be captured with a camera timer and a tripod (with some practice). If you don’t get the shot just right the first time, turn around and try again. The perfect angled bike shot isn’t always easy to get, but the payoff can be huge when it’s executed successfully.
The 90° Angle Profile Shot

If you want to show off your profile, the side of your bike, and the scenery behind you, the 90° angle shot is the photo you want to aim for! These types of photographs are best taken in areas up high (on mountains, vistas, etc.), where you can see far into the distance. Position the camera (on a tripod or with a friend taking the photo for you) and then simply cycle into the shot, pressing the shutter at just the right moment. While wide, fully-body shots are the easiest to get, you might try moving the camera a bit closer and capturing a close-up of you and your bicycle (as you see in the bottom-left photo above).
Cycling Away From The Camera

This is probably my least favorite type of bicycle touring photo because it lacks the emotion that comes with seeing someone’s face, but photos where you are cycling away from the camera can be a great way of showcasing the scenery through which you are cycling. These types of photos are less about you and more about the story that you’re telling. Like all of the photos in this article, these photos are easy to take with either a friend operating your camera, or with your camera set on a tripod (or another nearby object).
You, Your Bicycle & Your Tent

If you plan to camp during your bike touring adventures, then you absolutely must aim to get photos of you, your bicycle and your tent. These photos are fun, dynamic and really tell the story of what it’s like to go on a bicycle trip. These types of photos can be arranged in a number of different ways, but the main rule is that photo most consist of all three elements: YOU, YOUR BICYCLE and YOUR TENT. If you can add additional elements to your photo (such as another person, a campfire, or wildlife), then your photo will be even more interesting!
Naturally Unaware Of The Camera

Finally, consider taking a few photos where you are (at least pretending to be) completely unaware of the fact that you’re being photographed. These types of photos give off a realistic perspective that the more staged bike touring photos can not capture. The trick with this type of shot is to NEVER look at the camera. Just pretend that it isn’t there! I took the top-right and bottom-left photos myself with the use of a tripod and a camera timer. The top-left and bottom-right photos, however, were taken in a totally natural way – with the subjects being completely unaware that I was there with my camera and documenting their day.
Learn More About Bike Touring Photography
If you enjoyed these bike touring photography tips, be sure to read my article on “The Rule of Thirds” – which is one of the most important things you should know when framing a photograph of any kind. Whether you’re using your smartphone or an expensive DSLR camera to take your bicycle pictures, you’ll want to make sure you understand “The Rule of Thirds” before attempting to take any of the types of photos I have showcased on this page.
Can you somewhat detail the technique you have developed to capture video while you are underway on your bicycle? What are the best techniques for using your selfie stick, mountings to the bike,helmet or body and vibration issues, reduction in editing and or other. You may have covered this. If so point me to it pretty please.
Bill C.
That’s a really good question Bill, and it’s something I’ve been wanting to make a video about for a while now. I’ve not made that video yet, but I promise to do it soon. So make sure you’re subscribed to Bicycle Touring Pro’s YouTube channel – to make sure you see that video when I publish it here soon. https://www.youtube.com/user/bicycletouringpro
Hi Darren,
Well that will improve my photos.
Darren did u like the chicago to new orleans trip,I am from chicago and was thinking about doing it.
Yes, that was a good (relatively easy) bike tour. There aren’t a lot of mountains in that part of the country, so the riding is fast. I did it during the summertime, so it was hot and muggy a lot of the time as well. Bring lots of sunscreen if you do it. I got really fried out there! Otherwise, it’s a nice ride. Certainly not my favorite in the USA (I think the Pacific Coast is best/better), but I would probably rate that Chicago to New Orleans rides as one of my top 3 in the United States.
I always like a few Chris Froome perspective shots where you (the camera) are looking straight down at your stem. One sunny stem with a sunburned hand, one wet stem with rain wet bars and full gloves, one with stem and medic alert data from your map case, one with race profile for the stage taped to the stem, etc.
Let them see what you see, I say.