How To Take Better Travel Photos – Understanding The Rule Of Thirds
If you’ve ever gone on a trip and come home with a camera full of terrible, uninspiring photographs… then please keep reading. I wrote this article just for you!
Over the next several minutes I am going to teach you about a simple photo-taking concept called “The Rule Of Thirds” that, if you put it to use, will dramatically improve your travel photos and ensure that you come home from you next travel adventure with a camera full of captivating images.
To start, let me explain something: For the past several months I have been traveling through Peru by myself. I have a camera with me (of course)… but because I’m alone, I have no one else to take my picture as I slowly travel about. Because of this, I’m forced to ask strangers to take my photo – strangers who have no idea what The Rule Of Thirds is or how to properly frame a photograph.
HERE’S PROOF: Just look at the following 3 photos that strangers on my travels have taken of me:


Pretty terrible photos, right?
I’ve pretty much come to terms with the fact that after this trip is over, I’ll have very few good photos of myself in Peru.
Besides the fact that my eyes are obviously closed in the third image and the picture is slightly out of focus, these three photos do a good job of summarizing the terrible photos I get in return when I ask other people to take my picture. And I’m sick of it!
That’s why I decided to write this post – To teach people about The Rule Of Thirds and the simple art of framing a photograph.
I’ll explain more about The Rule Of Thirds in just a moment. But before I do that, take a look at these photos I’ve taken during my travels in Peru… and note the difference between these photos here and he ones pictures above.

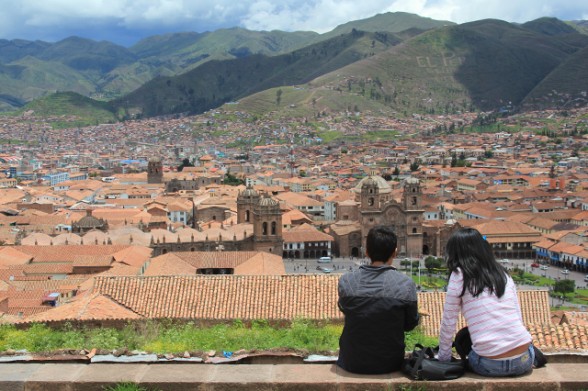




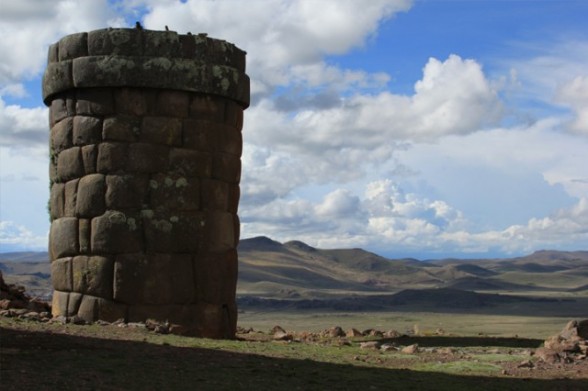
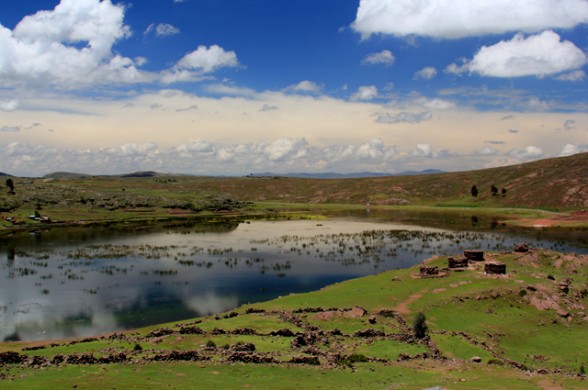
Now, I’m not the best photographer in the world (I’ll be quick to admit that), but I’m pretty sure the photos I’ve taken are a whole lot better than the ones other people on my travels have taken of me.
Do you see the difference between the first 3 photos I shared with you and the 7 travel photos pictured above?
If not, let me explain!
The main difference between the crappy photos at the top of this article and the images I just shared with you is that the images I shot were shot using a concept known as “The Rule Of Thirds.”
In order to best explain this concept, let’s take another look at that first crappy photo I shared with you.

Now compare this image to the photo below. Both photos are taken at the same place and with the same camera, but the difference between the two photos is substantial.

The problem with the first image is that it has my head placed directly in the center of the picture. This results in the boring blank sky behind me taking up half of the photograph… and the landscape behind looking less than impressive.
But look at that second photo now! It’s so much better… don’t you think?
It is! And it looks a whole lot better, because the photo is shot using The Rule Of Thirds.
What exactly is The Rule Of Thirds?
According to Wikipedia, The Rule Of Thirds “states that an image should be imagined as divided into nine equal parts by two equally-spaced horizontal lines and two equally-spaced vertical lines, and that important compositional elements should be placed along these lines or their intersections. Proponents of the technique claim that aligning a subject with these points creates more tension, energy and interest in the composition than simply centering the subject would.”
In other words… when you take a photo, you have to imagine that there are four red lines running across the front of your photograph.

There are two equally spaced vertical lines that run from the top of the image to the bottom…

… and two equally-spaced horizontal lines that run across the image from one side the other.

According to The Rule Of Thirds, the subject matter of your piece should lie on one or more of these dividing lines… or should be placed at one or more of the intersecting points of these lines.

To demonstrate, let’s take a second look at the two photographs we were just discussing – the crappy one with my head positioned directly in the center… and the better one with the subject positioned on the right side of the photo.
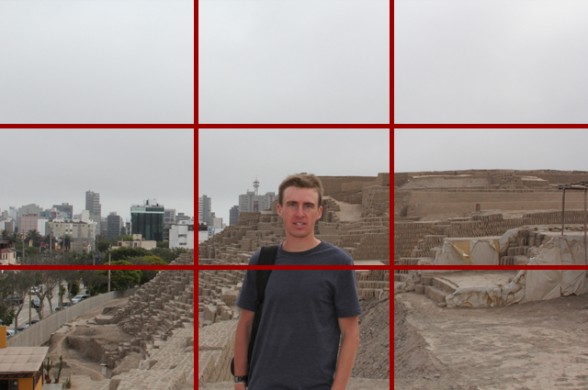
The image above is complete sh#* because it ignores the rule of thirds. Instead of positioning my body along one of the red dividing lines, the photographer placed me directly in the middle of the photo, which makes for a boring and unattractive image.
To make matters worse, the person who took my photo in the image above even went so far as to center the horizon line behind me. If he had attempted to place the horizon on the line down by my shoulders… or the line up above my head, this would have been a big improvement. But instead, he decided to center everything in the photograph (my body, my head, and the horizon) and the end result is a photograph that belongs in the trash.
Now let’s take a look at that second photograph. Remember: This photo was taken at the same location as the first photo… and with the same camera. The only difference is that I took the second photo while thinking about The Rule Of Thirds.
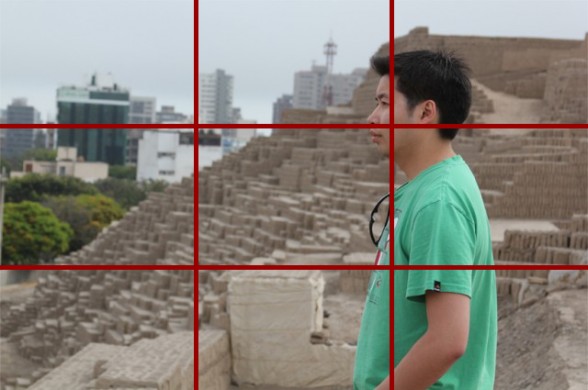
Do you see the difference?
The Rule Of Thirds is at work here because:
1) I positioned the subject along the vertical line on the right-hand side of the photograph.
2) The subject’s head is at the intersection of the horizontal line at the top of the photo and the vertical line on the right.
3) The subject is on the right-hand side of the image and looking off to the open space on the left, which creates a sense of direction and space.
4) And finally, the horizon in the background is located along the horizontal line at the top of the picture.
All of this combined makes for a much improved photograph. Don’t you agree?
So, that’s what The Rule Of Thirds is all about. It’s about positioning your subject along these four imaginary lines… and/or placing the important elements of your photograph at the intersection(s) of these lines.
Examples of The Rule Of Thirds in action:
To make sure you totally understand this concept, let’s go back and look at some of those other travel photos I shared with you earlier… and let’s discuss how each of these photos is constructed using The Rule Of Thirds.
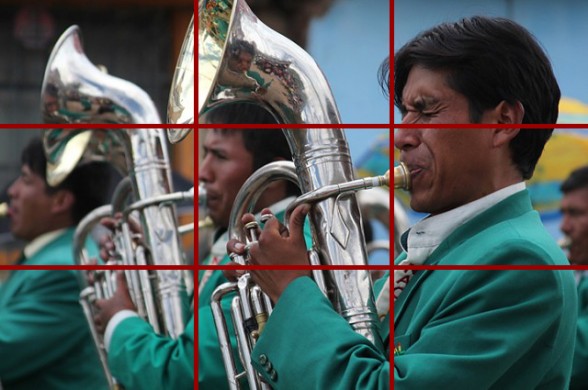
Okay. So here’s that picture of the tuba player once again. I snapped this photo during a street festival in Puno, Peru and it’s a great example of The Rule Of Thirds.
Using The Rule Of Thirds, the tuba player in the foreground (the one with the squinted eyes) is positioned along the right-side of the image. His body, combined with the instrument that he is holding, is centered along the right-most dividing line that runs vertically down the screen.
The tuba players eyes (the focal point of the image) are located just outside of the intersection of the two lines (the one running horizontally across the top of the image and the one running vertically on the right side of the image). And like the image above with the guy in the green shirt who is positioned on the right side of the picture and looking off to the left, the tuba player pictured here demonstrates the same characteristics. The open space on the left side of the image dictates which way the subject is heading.
Make sense? I hope so!
Now let’s look at another image with a totally different compositional layout.
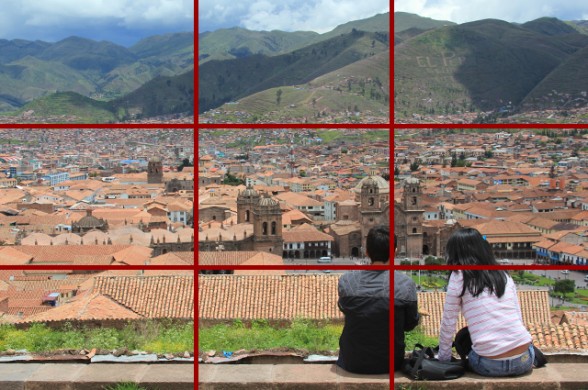
The image above is totally different from the previous two photos we’ve been examining, but even here The Rule Of Thirds is in effect.
- Note how the city limits in the distance run along the horizontal line at the top of the picture.
- Note how the horizontal line at the bottom of the image runs along the front of the buildings directly in front of the two subjects in the photo.
- Note how the two people sitting in the foreground of the photo are pushed off to the right side of the screen and their bodies are located almost perfectly along the right-most vertical dividing line.
- And note how the male subject’s head is located at the intersection of two lines – the line running vertically on the right and the horizontal line running across the bottom of the screen.
All of these elements combined make for another great example of The Rule Of Thirds in action.
By now I hope you’re starting to see what I mean when I talk about The Rule Of Thirds. If not, here are some more examples:
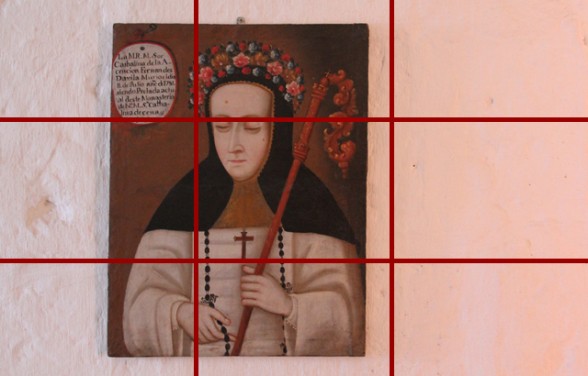
The image above is a picture of a painting that was hanging in a convent in Arequipa, Peru. I could have positioned the painting of the nun directly in the center of my photograph, but that would have been rather boring. Instead, I pushed the image of the nun off to the left, while at the same time positioning her close to the vertical line running from the top to the bottom of the image on the left-hand side of the photograph. At the same time, the nun’s eyes are positioned along the horizontal line at the top of the pic.
Here’s another example:
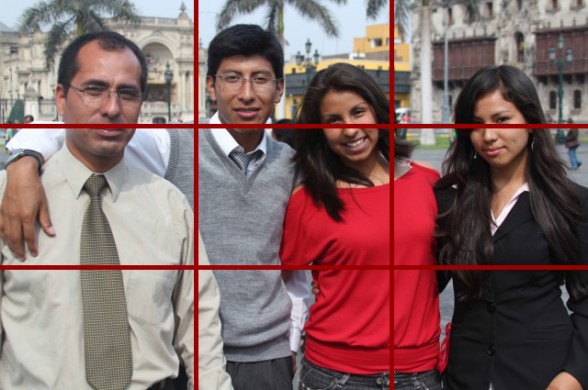
This group of young strangers approached me in downtown Lima and asked if I would help them with an English assignment they had been given by their college professor. I helped them with the assignment and then snapped this picture of the group.
Can you see how I used The Rule Of Thirds to frame up this photograph?
If I knew nothing about The Rule Of Thirds I probably would have positioned the people’s heads in the center of the photo. The end result would have been a whole lot of sky in the background and a four cut off bodies at the bottom.
Instead, I positioned the people’s heads along the horizontal line at the top of the screen… and the end result is an image that pops with character!
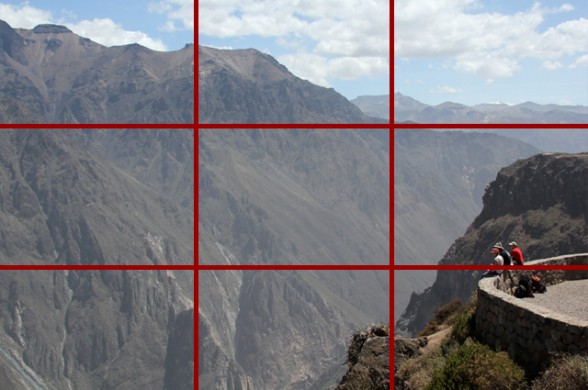
This picture from Colca Canyon, Peru is a little different. There is a huge amount of blank space on the left side of the picture, while our subjects (the three people sitting on the edge of the canyon wall) are located in the bottom right-hand corner of the photograph.
This image uses The Rule Of Thirds in three ways:
1) The three people in the bottom right-hand corner are positioned along the lower horizontal line.
2) The subjects of the photo are situated in the right-most quadrant of the image, while the object they are looking at (the canyon on the left) lies in the two remaining quadrants in the center and on the left-hand side of the picture. This is very similar to the first two images we examined – the one with the guy in the green shirt looking out over the pyramid and the city scene in the background… and the one with the tuba player marching from the right side of the screen to the left.
3) And finally, the distant mountains in the background are situated along the horizontal line that runs across the top of the picture.
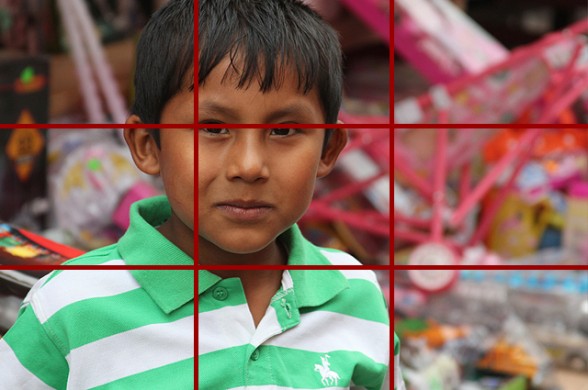
Here’s another example from the Christmas Market in Nazca, Peru:
The boy in the image above is framed up using The Rule of Thirds as well.
- His body is largely positioned along the verticle line on the left-hand side of the screen.
- His eyes are positioned along the horizontal line at the top of the screen.
- And where these two lines meet is where your attention is first drawn to when you initially look at this image.
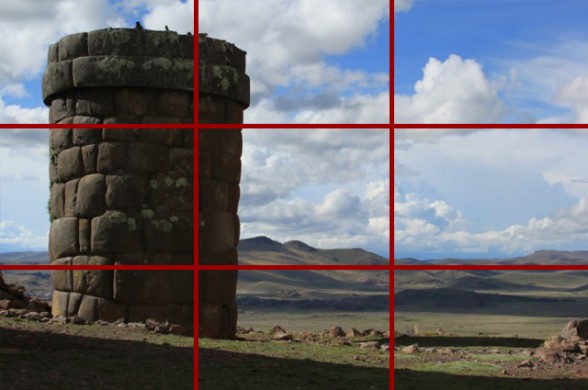
This photo of a chullpa (an ancient stone funeral tower) in Southern Peru is very similar to the image of the boy in the photo we just looked at.
Like the boy in the image above, the funeral tower is positioned along the vertical line on the left-hand side of the picture. But unlike the boy in the image above who had his eyes positioned along the horizontal line at the top of the screen, this image here has the horizon in the background running along the horizontal line at the bottom of the screen.
So there you have it! THE RULE OF THIRDS.
When you head out on your next travel adventure, keep this concept in mind.
Instead of positioning you subject directly in the center, position the important elements of your photo along one or more of the four imaginary dividing lines that you’ve learned about in this article. Your photos will be greatly improved… and instead of returning home with a camera full of lackluster images, you’ll return home with images that truly capture the experience of your travels!
Good luck… and happy shooting!
PS – If you’d like to improve your travel photography skills even more, be sure to check out this resource from my friend Darren over at the Digital Photography School website. It’s filled with tons of additional info on how to improve your travel photography.


great article Darren! thanks! i will share this! we need better photos all over! 🙂
Hi Darren,
I have enjoyed your website for a long time now. You have always been a gentleman and very professional. The language in the “Rule of Thirds” took a dive. crappy and shi#* are unnecessary. My high school PE teacher said “foul language is for people who cannot express themselves” You are better than that. Keep up the good work and watch your language.
Roger
I’m sorry you were offended by those two little words. But we aren’t in high school anymore… and people (myself included) do use these words in normal conversation. I don’t think it’s a big deal. Sorry!
Most importantly, you shouldn’t let these elementary school cuss words wipe away the entire content of this article. If you can ignore those two little words, then there is a lot of good stuff to learn here – especially if you are unfamiliar with The Rule Of Thirds.
Thank You for the info I had not looked at it that way before. This will help me out a lot.
Great article man!!! Hope you come to visit my country Brazil…
Wish you the best!
I want to come to Brazil very soon! Not this year, but soon!
Hi Darren, I always shoot Sh**y Photos and now I know why!
Hi Darren, You really do a great job with all your articles. This one was really timely for me because I was going over my recent tour pictures and weeping at their “suckness”
Thanks again Darren and cuss away… I can take it
hi Darren,
i have been enjoying (and learning from) your “classes” a lot. i’m taking the “course” as a mother whose son will soon be starting his route from Arizona to NYC, tagging along his dog. so, to mitigate my worries, i decided to learn more about bicycling in order to help him with the planning, and so forth.
you are a gifted and generous writer, with all the information you relay.
this post about picture taking is another example of that and it will certainly improve the quality of my photos.
by the way, i’m in Brazil too, so let us know when you come by. as far as Peru, i really love the country too.
thanks.
HI Patricia,
That’s so awesome about your son’s upcoming bicycle touring adventure. And with his dog too!
If you have any questions for me, don’t be afraid to ask. I’m happy to help in any way I can.
As for coming to Brazil, I thought I might do it on this current trip that I am on in South America, but in the end I decided to stick to Peru. My next trip to South American will definitely include Brazil.
Great article, as always! I already knew about the Rule of Thirds, and thankfully most cameras have a setting which will display the grid while you look either through the viewfinder or on a small LCD screen. I wish more people knew of this simple, yet effective, rule. I also have a problem when asking people to take my picture because I know 80% of the time it is going to come out with my smack dab in the center of the picture.
Great article and very well written.
Thank you so much for the tip. Now I know why there is a menu selection of grids in my camera.
I’m just curious how you take your own pictures, do you have a tripod and timer or someone is traveling with you?
Most of the time I am taking my own pictures. This is not easy to do. It takes a lot of work and a lot of practice. I usually just use a tripod and my camera’s timer to take my own photos.
Hi Darren
I have heard of this rule before but this article explains very well. With some of the “crappy” framed photos can you not crop them so that they then follow the “Rule Of Thirds”? eg https://goo.gl/yXEpZS
(NOTE: until I had read this article i would not have known how to make it look like that!)
Iain
In some instances, yes, you can crop your photos afterward to use the rule of thirds. But in most instances, you will get a better photo if you consider the rule of thirds while you are taking the photo.
I landed here through Google and this is *THE* best explanation of the Rule of Thirds I’m ever seen. Even the worst photographer wannabes – like me – would have no problem understanding this amazing and simple rule! Thank you!!