Freeload Rack Review: A Full-Suspension Bicycle Rack
When I first saw the Freeload bicycle rack at the 2009 Interbike tradeshow in Las Vagas, Nevada, I knew it was something that readers here at Bicycle Touring Pro would be interested in. But after more than three months of using the rack myself, I’ve come to the realization that the Freeload bicycle rack is one of the most exciting new cycling product I’ve seen in years!
The Freeload Rack is an adjustable bicycle carrier designed to fit any kind of bicycle – full-suspension bikes included! A rack that fits on standard road, commuter and touring bikes is one thing, but the fact that the Freeload rack so easily fits and functions on full-suspension bicycles is what makes this product such an industry changing piece of gear.
For years now, cyclists have been looking for a way to carry large items on full-suspension bicycles, but because of the various moving parts found of full-suspension bikes, traditional metal racks simply wouldn’t cut it. Adventure racers, every-day mountain bikers, and long-distances tourists on suspension bicycles have for a very long time now been looking for a way to carry the gear they need while out on their bikes without having to carry a backpack or rig up a home-made system to transport their belongings.
That’s where the Freeload Rack comes in to save the day!
The Freeload Rack’s unique design allows it to be both used and transferred between bicycles of any kind. Because the rack uses a system of tight fitting straps and ratchets to secure the rack in place, there is no need for your bicycle to have braze-ons or traditional mounting points (as has been necessary in the past). With a soft, rubberized foot and a patented attachment system that allows you to mount the rack to any frame, shape or material, the Freeload Rack is aptly named as “your platform for adventure.”
How To Mount To Freeload Rack To Your Bicycle
Fitting the rack to your frame for the very first time is the most difficult part of the process, but after you’ve done it once, you realize just how easy the installation process really is.
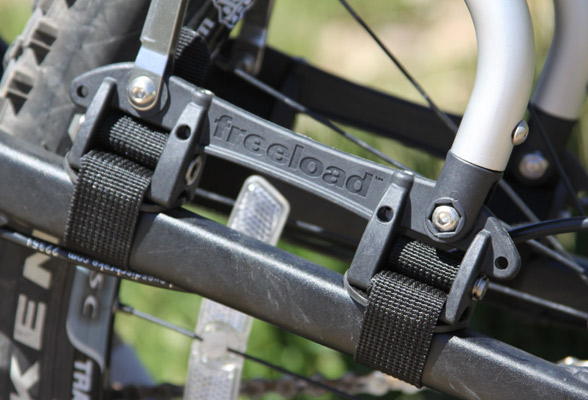
To start, first attach the mounting brackets to your bicycle’s fork or stays. The “Freeload” logos should be facing outward (as shown in the photo below). To lock the rack into place on your bicycle, wrap the black mounting straps around the fork leg or stay of your bicycle and back through the slot in the stainless steel ratchet pin. Then, using the included 5mm Allen-wrench, tighten the ratchet pin and take up any and all slack in the black mounting strap. Make sure the rack is positioned properly on the bike before tightening the straps all the way. Once you’ve done this on one side of the bike, do it on the other.
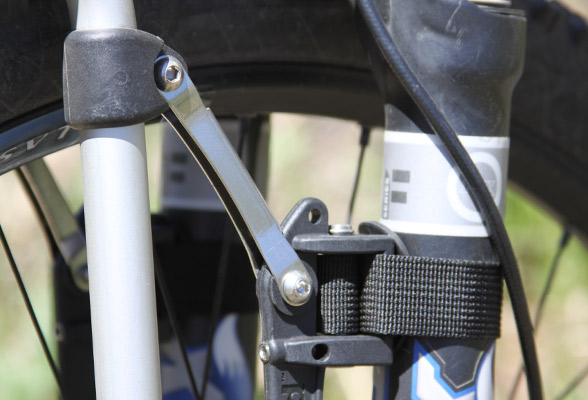
Next, select the correct stainless steel strut for your bike. The Freeload Rack comes with three different lengths of stainless steel struts, so that no matter what kind of bike you have, you will have the parts you need to correctly mount the rack to your bicycle. You want to select the strut that will allow you to mount the top of the rack so that it is parallel to the ground. For the front of my bike, I had to use the shortest strut available and mount it in an upward position (see the second photo below). For the back of my bike, I had to use the longest included strut. What strut you use will simply depend on what kind of bike you’re riding and the angle at which you wish to mount your rack.
Once you’ve selected the correct strut for your bike, line up the holes in both the mounting bracket and the plastic clamp on the rack’s frame and fit the stainless strut between these two holes with the supplied 15mm bolts (again, see the second photo below). After you fit the stainless steel strut between the mounting bracket and the frame on one side of the rack, be sure to do the same on the other side. Keep the bolts loose while doing your initial installation so you can adjust the rack perfectly before tightening into place.
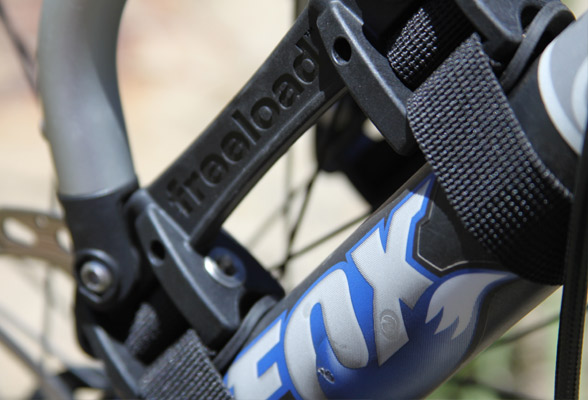
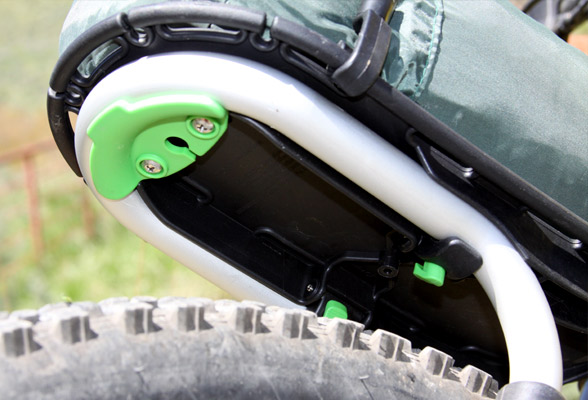
Once you’ve got the rack securely mounted to your bicycle’s frame/fork, you can clip on the top deck. To do this, flip the deck upside down and push the green release buttons on the bottom of the deck so as to open up the two attachment hooks. Then, push the top deck’s green toe plate (shown below) into place inside the curved part of the rack. Now, flip the rack right-side up and use your hands to push down firmly on the center of the rack until you hear a loud, resounding “click.” This click is the sound of the green hooks on the bottom of the top deck locking onto your rack. Once you hear this noise, your rack is locked securely in place. If necessary, move the rack forward, back, up or down depending on where exactly you want it mounted on your bicycle. Once you’ve got the rack in a position you like, lock it down by tightening all of the necessary bolts and ratchets.
Mounted On The Back Of Your Bicycle
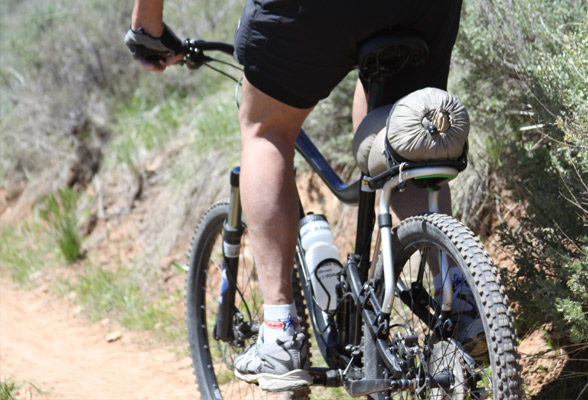
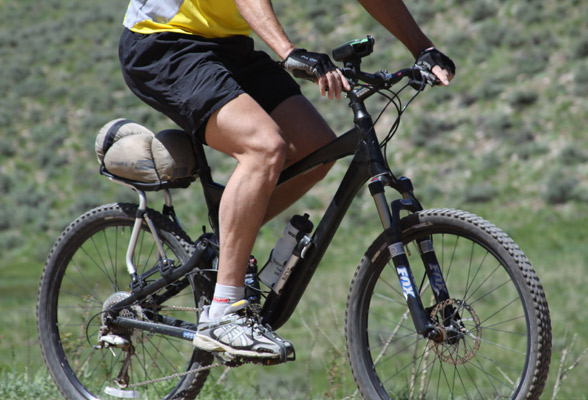
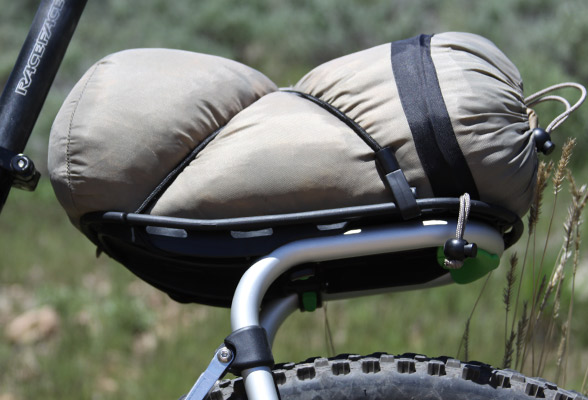
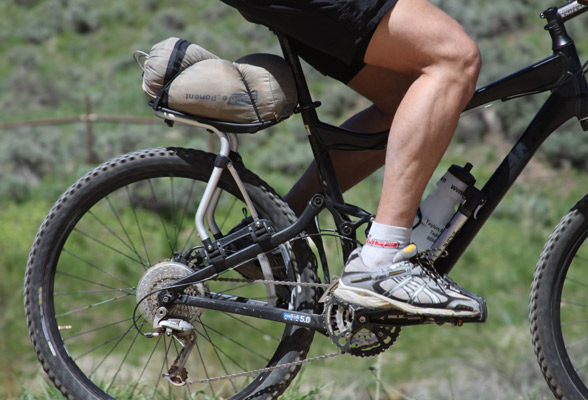
The photos below show the Freeload Rack mounted to the back of a full-suspension bicycle. On the rack is a sleeping bag, secured with the two small bungees that are included as part of the rack attachment system.
With the Freeload Rack in place and gear mounted to the back of your bike, the rack is nearly 100% undetectable. On the back of your bicycle, you’ll be hard-pressed to even notice that you’re riding with a rear rack at all. The rack in no way affects your handling of the bike; it does not interfere with your wheel, seat post or frame stay; and it carries your gear exactly as it should.
On the back of your bike, the Freeload Rack is a total A+.
Mounted On The Front Of Your Bicycle
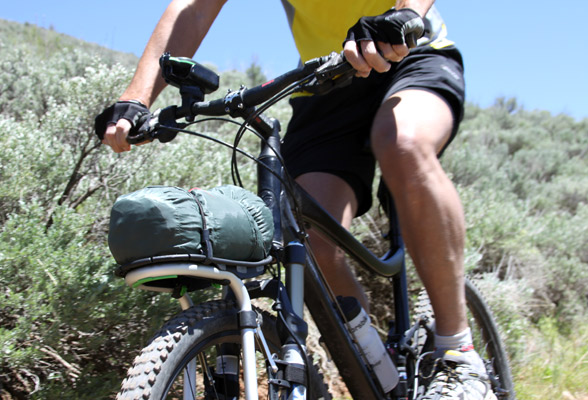
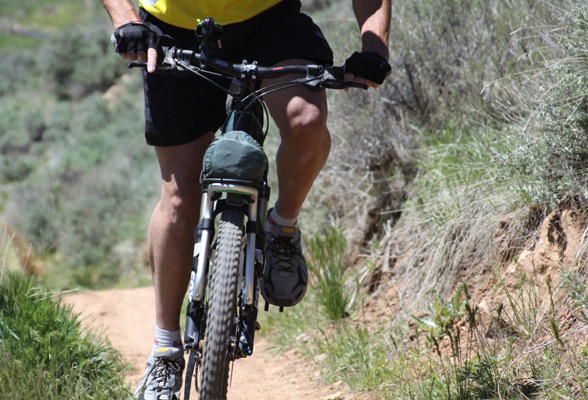
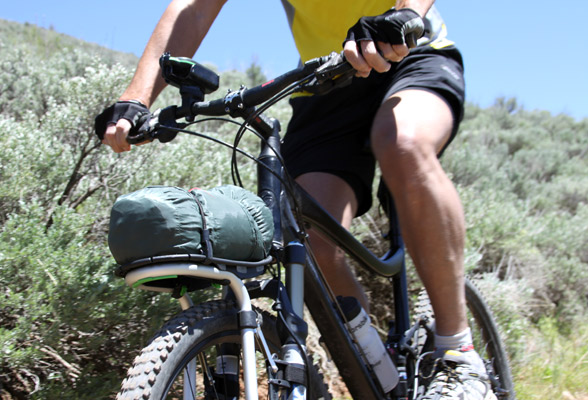
Mounted to the front of your bicycle, the Freeload Rack performs nearly just as well. Again, the design of the rack prevents it from interfering with the wheel, fork or frame of your bicycle and it performs as it should by transporting your gear in style and ease.
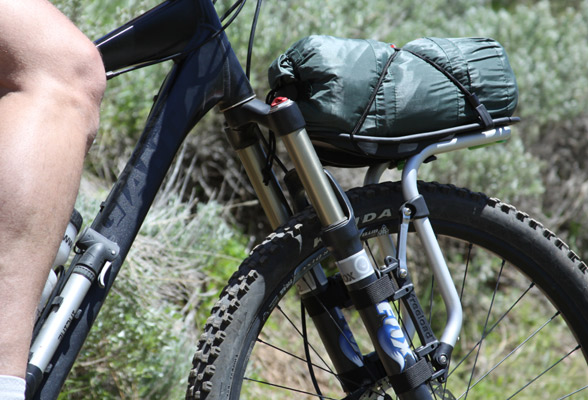
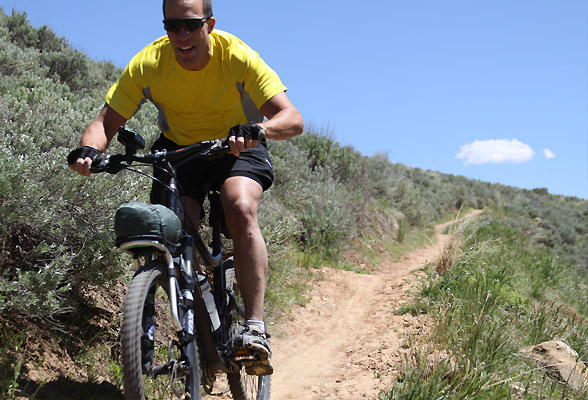
The photos below show the Freeload Rack mounted on the front of a full-suspension bicycle and carrying a small tent.
With the rack up front, the handling is almost the same as if the rack weren’t there at all. But as is normal when you add any kind of weight to the front of your bike, it does cause a little drag – something that may take a little getting used to for some riders. The more weight you add, the more drag you create and the more difficult your handling becomes.
The biggest problem with the rack up front, however, is not the way the bike handles with it in place, but the fact that the rack can block the view of your front tire. For some riders, I fear this may be a small problem. When riding over rough and rocky trails and roads, many riders want to be able to see what their front tire as they approach oncoming obstacles. Unfortunately, with the Freeload Rack mounted up front, this can be a little difficult.
Personally, I have no problem with not being able to see my front tire as I ride, but my model (shown in each of the photos in this review) shared with me that not being able to see his front tire was throwing off his riding just a bit. I assume that this, like many new products when you first try them out, is something that you simply have to get used to.
Overall Impressions Of The Freeload Rack
In the end, the Freeload Rack is one of the most exciting and well-designed products I have come across in years. It has the potential of changing the way many cyclists carry their gear… and with some of the additions and add-ons the company has planned for the product in the future, the Freeload Rack could one-day become a serious player in the worldwide bicycle market.
The best features of the Freeload Rack are that:
- It fits on any kind of bicycle – full suspension bikes included.
- It is lightweight.
- It is made to handle the demands of heavy off-road riding.
- It is easy to adjust once on the bike.
- The rack can work on both the front and rear ends of your bicycle.
- It comes with all the necessary parts and tools needed to mount it to your bike.
- It doesn’t affect your handling (hardly at all) or interfere with any moving parts.
- There are a bunch of add-ons planned for the product in the future (including the ability to carry panniers)
The things I don’t like about the Freeload Rack are that:
- It is a bit tricky to install the very first time. I’d love to see the company produce a video showing both how the rack works and how it functions out on the trail.
- Because of the placement of the ratchet pins, tightening the attachment straps is a slow and frustrating process (as you can only turn the Allen-wrench one click at a time).
- There is a key that you have to use to unlock the mounting bracket from you bike. I would rather not have a key to carry around and potentially lose. It would be better if I could detach the rack using another 5mm Allen-wrench.
My Overall Rating: 10 out of 10
For more information on Freeload Racks, head on over to: www.freeload.co.nz
Review Status: This product was sent to Bicycle Touring Pro for free for the purpose of this review.

Very interesting rack. The website mentions that it can be used with panniers although doesn’t show any photos or explain how to do this. It doesn’t look like most other racks which are designed for panniers. Did you get a chance to test it with any panniers? If not, how hard do you think it would be?
It’s a nice thought…OUT OF STOCK
My question for you, Do you think this is a good replacement for bikes with braze ons and set up for touring?
Thanks, you always have some great posts.
David
David,
At this point, the Freeload Rack is really meant to carry items on the top of the rack that can be bungee corded in place. However, they’ve just come out with an add-on to the rack you see in this review that will allow cyclists to carry panniers on the sides of the rack. I have not tried out this new pannier-capable rack yet, so I can’t really say whether or not this is a good replacement for traditional touring bikes that are already set up to support front and rear racks. The Freeload rack in this review would not be a good replacement for most touring bikes capable of carrying panniers, but the company’s new pannier-carrying rack very well may be an excellent alternative to traditional bike racks.
The Freeload rack is a good idea, and looks like a solid product, but in my opinion, if it can’t haul panniers, that’s a major design flaw. You did say the company is debuting an “add-on” to hold panniers, but that’s implying you have to purchase an extra part, which is absurd considering the Freeload is priced at $179 (pricey even for a good rack.) And it’s currently not available! With that said, I supposed you’re paying for the rack’s ability to clamp to nearly any bike. But why the 1st generation Freeload wasn’t designed to hold panniers…I don’t know, but it is an interesting rack design. Looks like the Freeload is full-suspension bikers that want to do ultralight, off-road “bike packing”.
Jim, the Freeload rack (the way you see it in this review) was not designed to carry panniers, so it’s not a design flaw. The rack here was designed for people who want to carry a small amount of gear on their bikes, not on their backs. This is perfect for every-day mountain bikers, adventure racers, etc. The rack shown here is not made for touring.
I think of the Freeload rack very much like the Yakima racks that people put on the tops of their cars. You first have to purchase the bare-bones rack and then you purchase the additional add-ons, depening on what kind of gear your plan to carry (bicycles, snowboards, skis, a kayak/canoe, etc). From what I understand, the Freeload rack is going to function in very much the same way. The bare-bones rack (which you see here) is the first step, then getting the additional pannier mounts (and other add-ons the company plans to produce in the future) will be extra.
As for the price, yes the price is a bit steep. But price is subjective. For some people $179 NZD is going to seem outrageous. For others, they’ll see it as quite reasonable. Honestly, I think the rack is priced just about right. But that’s just my opinion. What really matters is whether or not people buy it at its current price. In the end, that alone will determine whether the price is right or not.
I note the price on their website is in New Zealand dollars – 179 NZD which equates to about $125 US. Plus it looks like you take off their local tax … Big fan here!
keep me informed when the Free loader will be available in north america
I just purchased a Freeload rack in Bangkok. To my surprise, the rack did not come with the mentioned bungee cord. I asked the dealer they said that in the new shipment the bungee cord is not included and will later be supplied as option for the buyer to choose. But in their website every picture still shows the bungee cord. Anybody who recently bought this item, does your item come with the bungee cord or not?
S. Chan. This is the first I’ve heard about the Freeload Rack not coming with the bungee cord. How much are they charging for the bungee cord add-on? I can’t imagine it’s much? But yes, it certainly would be nice if the bungee were automatically included.
Interesting, but what’s the point? About the same volume/weight, if not more, you can carry in a saddle stuff sack and a handlebar stuff sack _without_ the weight of the rack. They aren’t cheaper though 🙁
What makes this rack so special is that it works so well on Full-Suspension bicycles. That’s what you’re paying for… and what makes it different from so many other racks on the market.
Hi everyone- I just became aware of this review and thread- and thought I should step into the conversation… I’m one of the designers of Freeload products, so can hopefully shed some more light on things : ]
Firstly- I just want to say a big thank you to Darren for the fantastic review! We’re really glad you like the rack. Also thanks for maintaining this thread and answering everyone’s questions- you certainly have a very good understanding of the product- its great to read your opinions and insights after using them for a while. If you drop me a line, I’ll get some of the new products out to you to try?
I thought I’d just go through some of the comments and answer from my perspective… hopefully this helps.
Adam- yes… the big question- pannier compatibility. Darren’s reply to this was spot on- the original deck is not designed specifically to accept panniers- rather to take top-mounted loads for off road trips. Having said that- I have used several types of smaller panniers eg: Ortlieb ‘front-rollers’ and the like for many kilometres of riding in varied conditions, no problem. The trick is finding a combo which gives you the heel clearance required, and a pannier which is self supporting enough to keep from bouncing into the spokes when it gets rough.
I just came back from a three day trip here in NZ on some very demanding technical trails (with a lot of carrying)… this kind of trip wouldn’t work nearly so well with panniers- due to ground (and bush) clearance, all the lifting, and general hammering the bikes took. In a group of 6 riders there were two of us riding hardtails. Everyone’s gear setup was a little different- I had a rack on front and back- one drybag, and one daypack which I could chuck on my back for the longer carrying sections. The other guys had a mixture of one rack or two, and they all had small daypacks. We all carried 3 days worth of food and water, sleeping gear, tools etc etc. Versatility is important- everyone likes to do it differently… and options are GOOD.
Sorry- I got a bit off topic there!
So- yes… we are about to release the new pannier compatible deck, it will be available as an accessory for anyone wanting to ‘upgrade’ their original… and it will be offered in a complete kit like the original (everything included).
This deck is different in that it has a flat surface, with no upturn at one end, and it features 10mm aluminium rails on each side… these can be repositioned, giving you an extra 75mm of fore/aft adjustment- which is important on many small frames and shorter wheel-based mtb’s.
In addition to this we have designed ‘side frame’ accesories, which bolt onto the end of the alu rails on the deck, and clamp the the racks main frame. These add extra support, as well as many more options in terms of pannier position… height wise and fore/aft. You can run lowriders if you want, or even set them up so that the pannier hooks are well above the level of the deck.
We decided to offer these as an accessory, because many people will be able to use their panniers without them- and we would suggest that people try this approach before buying the whole setup.
Peacetraveller- Sorry you think it looks funny! But I have to disagree with you call on “not for long distances” … The racks have only been on the market for one year, so the jury is still out on ultimate durability… they have been well tested though, both by us and customers… we currently know of four people riding in the 12 000 km Tour d’Afrique… several Great Divide riders, and many more…
Of the 3000 odd racks we sold last year, we’ve had one back with a broken deck, and a couple missing small parts in assembly. Thats it.
One big advantage is that the racks can be rebuilt with spare parts very easily (and cheaply), plus we designed them to be as field-repairable as possible… no welding required!
David- yes, we have had some issues with stock management… this is a bit of a teething problem due to being a start-up business- cashflow requirements, trying to get to grips with the size of the market etc… rest assured we’re getting on top of it though! Our distribution network is improving quickly, we have great partners in Australia, Germany, the Netherlands, Belgium, Switzerland, Canada, and now the U.S. so the racks should be much more easily available soon.
We don’t see the design as being a replacement for touring bikes with braze-ons,
rather it gives more people the option of being able to use their bike in this way.
We deliberately targeted the mountain biking end of the spectrum with the original product, as there is the biggest gap in the market here- there is no need to design racks for touring bikes… these are already well covered.
Again- Darren describes this really well in his comments.
Price- yes- the current model goes for $179 NZD, which equates to about $125 USD… sure we could have made them cheaper, but do not want to compromise quality and therefore safety and durability in any way. There are comparable wire and tubing racks out there which sell for more, and arguably do less…
S. Chan- We deleted the bungees from the design several months ago as they weren’t performing to our expectations- we’ve been slow to update the images on the website, and our printer also made the mistake of printing the old version of the instruction manual that went in the batch you have recieved… I’m very sorry for the confusion.
We are looking at options for new strap and bungee designs, which will possibly come in the box too, but I can’t say for sure. We won’t bring out just another bungee though… there are plenty of those out there…. we’ll do something better hopefully ; ]
Darren hit the nail on the head with his comments about modularity- we have new products in the works which will clip onto the racks and add other uses and functions… further extending the usability of your bike. But for now, hopefully the new deck and side frames will answer a lot of people’s questions about panniers…
Its not THE solution, just another OPTION… one we hope you will like : ]
So- a bit of a novel there I’m sorry! If you made it this far- well done!
Check back on our website soon- hopefully we’ll have some info and dates on the new products…
Cheers
Tim
But where is it made? I’m taking a firm stance on not buying anything made in china. I couldn’t tell from your review where this item is made. Is it made in the USA, Germany, England?
Hi Mark. I’m not exactly sure where the rack is made… but I do know that the company (FREELOAD) is located in New Zealand. Maybe someone from the company can comment on this? I don’t have the rack with me as I am currently traveling in Peru.
Hi Mark, the racks are manufactured in Taiwan. We put a lot of effort into finding a manufacturer here in New Zealand that could build the racks to the standard we require, but could not… it is a quality thing, not a cost cutting measure by any means. Our Taiwanese partners are extremely good at what they do : ]
Thanks for the write-up and good reading.
Any idea on release dates and price of the new model?
Cheers,
Poe
It’s OK. Just found them. Must have been released very recently as I only looked at this site the other night.
https://freeload.scmdemo.com/pages/9/Products
Poe
Hi Poe- glad you found them…. we just rebuilt the website and launched it last Friday.
That link you posted will stop working soon (it was the working model) here is the current one: https://www.freeload.co.nz/pages/9/Products
Cheers!
Tim
These racks are great and quite simple to attach. I also bought the side frames to carry panniers which is what I mainly wanted it for. I have Ortlieb classic panniers (2 sizes: for both front and back) and they just do not fit. Sure they attach at the top of the rack but the attachments at the bottom of the panniers just do not fit any of the ‘plethora of slots’ of the freeload side frames. I am a little disappointed.
Would have been great if the designers stated what panniers they actually used to base the design of the side frames on so that. Getting in the rough now does not seem such a good viable option.
I am happy but disappointed at the same time.
Cheers
Gregory Solomon
Hi Gregory,
I wonder if you’ve tried positioning the lower hooks on your panniers behind another section of the side frame – rather than trying to line it up with the slots?
I have three sets of the Ortlieb classics here in front of me, each with slightly different mounting systems. They can all be configured to fit, lower hook included.
The slots were initially intended for routing straps through the frame, rather than to accept pannier hooks… though this is another good use for them.
If you’re still having trouble getting them to fit, please feel free to drop me a line at team@freeload.co.nz and maybe send me a photo or two of your setup so I can offer more advice.
When it comes to rough off-road riding, I think you will find that the lower attachment hooks are fairly redundant anyway – they are designed for on road riding, and tend to disconnect at the first decent bump. This is the reason we included the slots in the frames for strapping through and securing the panniers properly.
Cheers
Tim
Hi Rolondo, you’ll need to contact the company at https://www.freeload.co.nz/ I don’t sell the Freeload racks. I just reviewed them.
As far as suspension is designed to isolate the sprunga mass (rider + front triangle + part of the moving links), from the loads generated by road irregularities; adding mass to the unsprung part of the system (wheels + moving parts of suspension) makes no sense at all. Making your load move up and down along with the wheels will INCREASE vibrational input to the rider. Covers your head, uncovers your feet…
To Leonard
interesting points about suspension, you are probably right that these racks are not a good idea suspensionwise but they will hopefully allow me to ride in areas where I never could go with a rigid bike. My plan with these is to ride on footpaths and utility roads in the mountains. Not fast but as smoothly as possible on a shortravel FS-bike.
Great concept but looking at those pictures of the rack mounted on the rear – how when packed does the pack not collide with the rear of the seat post when the rear shock is active? That sleeping bag is going to compress into the seat post for sure… So would anything else. It is after all not a straight up and down motion like the front fork – the rear shock bends the rear wheel IN towards the bike.
These are now being produced by Thule (freeload sold the rights). The pannier and non pannier versions are up on their website as “Thule Pack ’n Pedal™ Tour Rack” and “Thule Pack ’n Pedal™ Sport Rack” respectively. Google them for more info.
what is the weight capacity ? Are there a few other models , or just one? where can i see a range of free load racks? Can the same rack be fitted in front and rear? Can they be shipped to India?
Is the price really $ 179 per rack?
Too expensive it can carry not more than 10 kg..
Amit.
I’ve got the Thule version of this, which I’m trying to use on a Specialized Camber 29’er full suspension bike. It doesn’t work very well. If you mount it so the bed is horizontal, there is so little clearance to the tire that putting even a small amount of weight on it causes it to crash into the tire. If you push it forward so the bed tilts down to get more clearance, besides being awkward to balance a load, it reduces the already-stingy length of the bed because part of it will be blocked by the seat. This needs to be completely redesigned, especially for a 29 inch bike.
Henry Lieberman
Freeload and Thule are the same thing. Freeload was purchased by Thule a few years back and now they are one and the same. When I wrote this review, 29 inch tires were not yet really popular. You probably have a good point that this product may very well need to be altered now that there are larger wheel sizes out there.