How To Plan A Safe And Enjoyable Bicycle Touring Route
One of the biggest, most challenging, and most fun parts about bicycle touring is planning a safe and enjoyable route. In this article, I’ll walk you through several of the most common ways to go about planning a bicycle touring route of any length.
Because there are so many possible bicycle touring routes all around the world, I won’t be able to tell you exactly which roads or bike paths you should be cycling on at any given time, but instead, I am going to give you some general rules to follow when planning the route in which you intended to travel.
I will give you a number of basic strategies that you use to plan out a safe and enjoyable bicycle touring route and provide you with a number of example bike tour routes so you can see how the planning process can be done. But once it comes time to start planning your own cycle touring route, it will be up to you to use the information I have provided and apply the principles from this article to create your own unique bike tour route plan and itinerary.
With Guidebooks / Maps
One of the easiest ways to plan a bicycle tour is with the assistance of a bicycle touring map or guidebook. There are several locations in the world where bicycle touring is a popular, almost everyday activity, and because of the popularity of these routes, there have been several guidebooks written about cycling in these areas.
The Pacific Coast of the United States, the Bodensee in Germany/Switzerland, and the Loire Valley in France are just a few of the areas in the world that have extensive cycling guidebooks written about them.
Guidebooks such as these will not only provide you with detailed maps of the area, but will also give you turn by turn directions, important GPS coordinates, information on where to eat and sleep along the way, data on what type of gear and equipment you should be using on that particular route, details about what kind of weather to expect at different times of the year, plus a whole lot more!
Guidebooks such as this can be found on the website at: https://bicycletouringbooks.com/product-category/guidebooks/
In addition, similar bicycle touring route maps can be found at several places online. Try the links below for maps in the United States and Europe. Additional cycling maps and resources can frequently be found on the tourist organization’s website of whichever country you are planning to visit.
- The Adventure Cycling Association Route Network
http://www.adventurecycling.org/routes-and-maps/
- EuroVelo Routes
http://www.eurovelo.com/en/eurovelos
If you are new to bicycle touring or are looking to travel along one of the world’s more popular bicycle touring routes, using a guidebook to plan your travels is a great place to start.
With Traditional Road Maps
If, however, you’re interested in conducting a bicycle tour that is outside of mainstream bicycle touring routes and you want to create a more customized route for your travels, the next obvious step is to plan your trip using a set of traditional road maps – like the kind you might carry in the glove-box of your car.
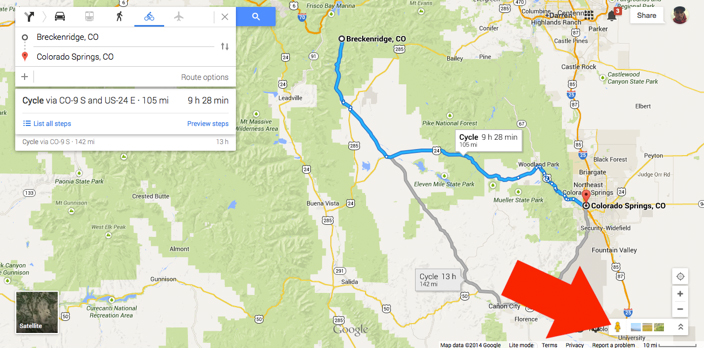
Consider the map on the following page:
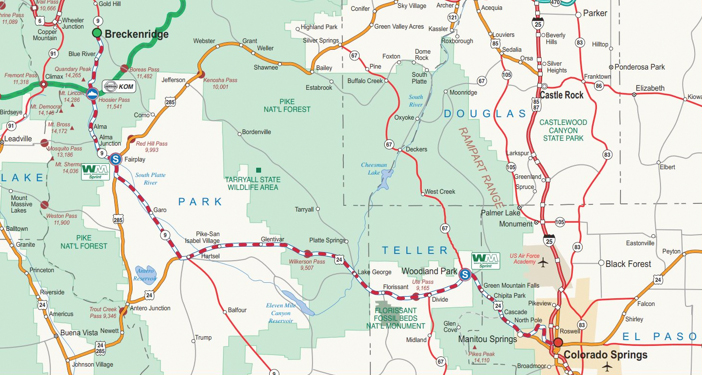
In this example, we are going to plan a route from Breckinridge (the green dot in the upper-left-hand corner of the map) to Colorado Springs, Colorado (the red dot in the bottom right-hand corner).
Taking a look at the map very quickly, we can easily rule out cycling on the 25 (the road running from Colorado Springs north to Castle Rock and beyond) because this is a large, interstate freeway and bicycles are surely not allowed. Every other road, on the map, however, can be cycled on because the roads depicted are either smaller highways or quiet backroads.
The red and white dotted line is the route you would most likely want to take if you were cycling from Breckenridge to Colorado Springs… and you’d take this route because it is on two small highways (the 9 and the 24).
As you will see in just a moment, we can further inspect these roads for safety using the Internet. But for now, just know that this is how you would use a traditional road map to plan out your routes:
- Determine your starting and ending locations and the general distance between the two.
- Eliminate any major freeways or toll roads that bicycles won’t be allowed on.
- Then determine the quickest, safest and most enjoyable route between the two points.
With Online Maps
Continuing with our example above, let’s now say that we want to confirm this route online. Using Google Maps (or a similar free online mapping solution), we will double-check this route’s distance, road type and overall safety.
To start, go to your favorite web browser and type in: maps.google.com
Then type in your starting location (Breckenridge, Colorado) and your destination (Colorado, Springs, Colorado). Then click “Enter”. You should get a map that looks something like this:
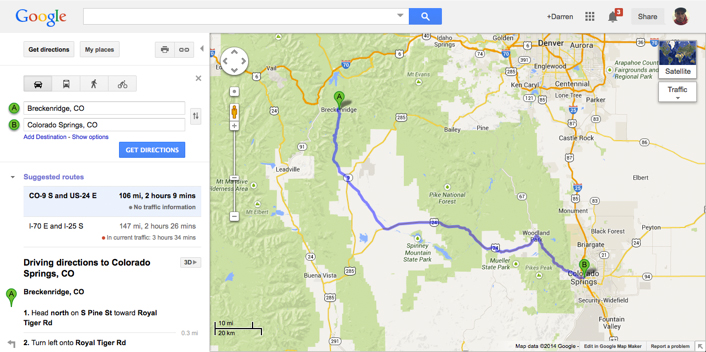
It should be noted that the route Google recommends and the one we created ourselves using a set of traditional road maps is the same.
If you want to double-check and make sure that this route is bicycle-friendly, click the bicycle icon located near the mapping route options in the upper left-hand corner and take note of any changes to the route.
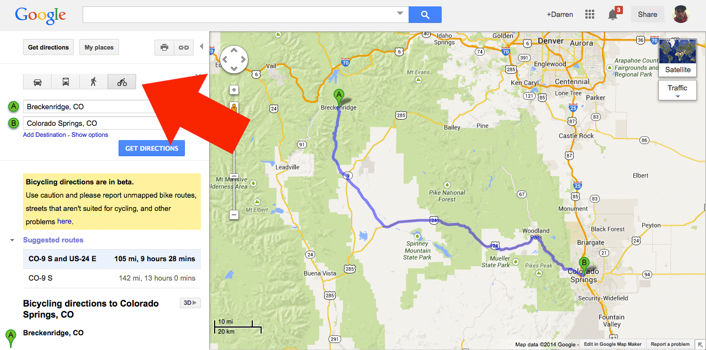
Clicking the bicycle button in this instances makes almost no change to the initial route. If you look closely, Google does suggest you get off highway 24 and take a smaller side-road once you get close to entering Colorado Springs, but otherwise, the car and bicycle routes are almost entirely the same.
I mentioned earlier that the 25 freeway running between Colorado Springs in the south and Castle Rock to the north was a road to be avoided because it was obviously a much larger freeway and bicycles would not be allowed on it. Now let’s confirm that with Google Maps.
Go to maps.google.com and enter “Castle Rock, Colorado” as your starting destination and “Colorado Spring, Colorado” as your final destination. Then click enter.
Your map should now look something like this:

You will note that since we are asking for driving directions at this point, Google has recommended that we travel on the 25 freeway – the fastest and shortest way to get from Castle Rock to Colorado Springs. But because we are not traveling in a car and are instead going to be riding a bicycle, we need to check for a route between these two cities that is best for cyclists. Click the bicycle icon like we did just a moment ago and note how our route drastically changes.

With the bicycle route option enabled, Google has suggest a similar, but totally different route for us to take. If you take the time to zoom in a little bit and follow the route that Google is suggesting, you will see that this new route avoids the 25 freeway entirely and, instead, suggests that you travel on small side roads and highways.
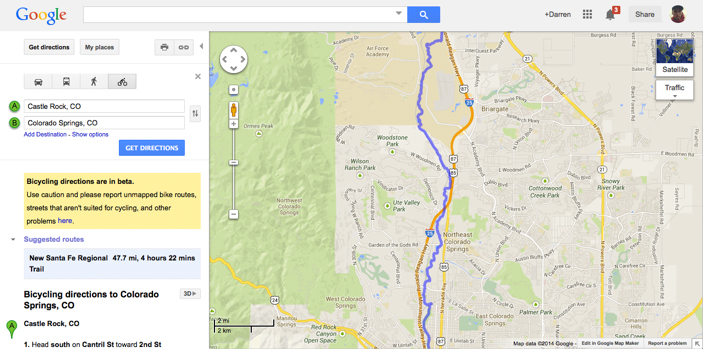
With this new bicycle-friendly route, the distance has not only increased from 41.5 miles to 47.7 miles, but a number of turns have also been added to the route, increasing the navigational difficulties and thereby, increasing the total travel time.
While Google suggests a total travel time of 4 hours and 22 minutes for this particular cycling route, keep in mind that the time it take you to complete this route will vary significantly from person to person. Some people will able to complete this route much faster than this, but if you take your time and stop to take pictures or talk to people along the way, it might take you several more hours to reach your destination.
Going back to our previous example (the bike route from Breckenridge to Colorado Springs), let’s say we want to go a whole step further and triple-check the safety of this route.
Now that we have 1) determined the route to be the fastest and safest route between these two cities and 2) we have confirmed the fact that this route is in fact bicycle friendly (according to Google, which, by the way, is not always correct), we want to take a look at the road yourself to see 3) how much traffic is on this road and how much shoulder space there is to cycle in.
To do this, we once again go to maps.google.com and type in Breckenridge, Colorado as our starting location and Colorado Springs as our ending destination. Then go ahead and click the bicycle icon.
Now you want to search your screen for the icon of a small yellow man. This is what Google calls “Pegman” and using this icon allows you to access Google Street View, which is an impressive tool that provides panoramic views from positions along many streets all around the world. For us, Google Street View is an excellent way to scope out the routes we plan to take when bicycle touring in various locations all around the world.
So find the yellow Pegman on your screen. Depending on what version of Google Maps you are using, he may be located in either the upper-left or lower-right hand corner of your screen.

Once you’ve spotted the Pegman, click on him and hold down. Now drag the Pegman over to the blue line representing your intended route of travel. With Pegman now selected, your screen should light up with a number of blue lines representing the possible places where you can access Google Street View. For the time being, ignore all the possible Street View locations and drag the Pegman over the route we have created.
Then let go of him once you have positioned him over a stretch of road on either the 9 or the 24.
As soon as you let go of the Pegman, your map will disappear and you will be presented with a picture of what the street in that part of the road happens to look like.
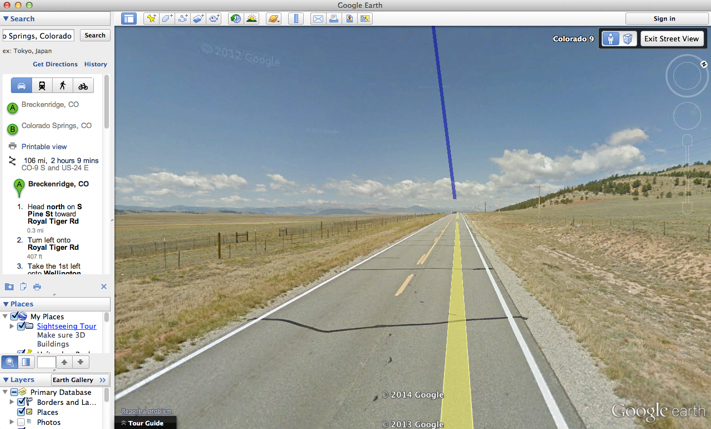
For example, I let my Pegman go over a random stretch of road on the 9 just south of Breckenridge and this is the image I was presented with:
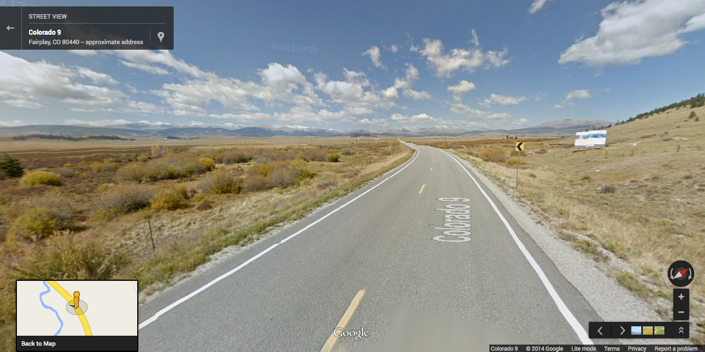
Looking at this image I can tell that this road has very light traffic (there are no vehicles of any kind depicted in the photo, which is a good sign of there being little traffic) and that the shoulders are pretty narrow (maybe only a few inches of asphalt… with about 16 inches of gravel to the right of that).
So you see, I’ve been able to obtain some very important information from this single image obtained through Google Street View. I’ve not only learned that this road is low in traffic (a good thing) and has a narrow shoulder in this section (a bad thing), but that the road is also legal to cycle on (I can tell simply because this is not a large interstate freeway and is therefore surely open to cyclists).
Go back to your map now for a moment and try dragging the Pegman to another location along our route. Let’s see if you can find a spot that looks completely different from the one you found just a moment ago.
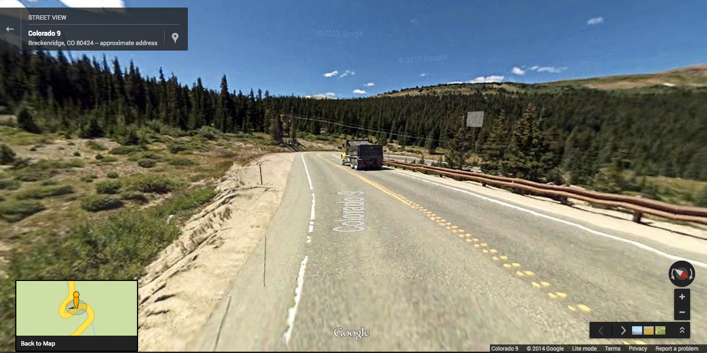
In the image above, I’ve dropped the Pegman over a windy, uphill section of road on the 9 south of Breckenridge. This area is much greener than the last road I viewed with Google Street Maps, and the shoulder has also gotten a bit wider in this area. It’s also important to note the vehicle in this photo, as it may be representative of the types of vehicles driving on this particular road. Still, the traffic is light and the road conditions look pretty good.
Using this technique, you can drag and drop your Pegman over just about any location on your route and investigate in great detail what condition the roads are in, how much traffic there is, and how much of a shoulder there is to cycle in.
With Google Earth
If you want to get really extreme with your route planning, you might try downloading a free copy of Google Earth.
This free software is essentially a detailed map of the earth created by the superimposition of images obtained from satellite imagery, aerial photography and geographic information system (GIS). With this software you can map out routes, view 3D representations of famous or historic buildings all around the world, access important topographical information, and a whole lot more. You can even use Google Earth to preview the routes you intend to travel on your bicycle tours.
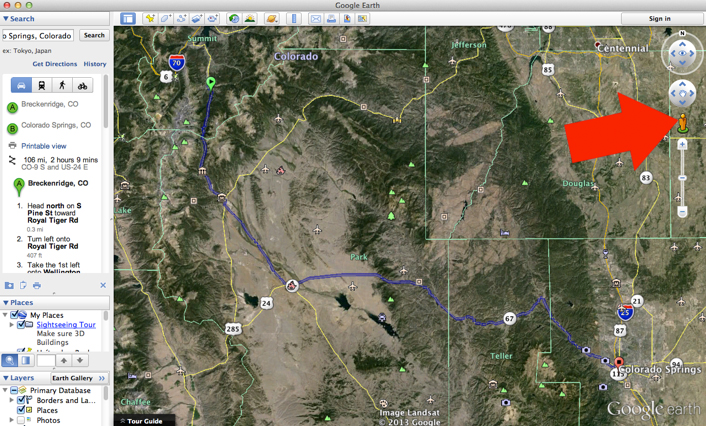
To view a 3D flyover of the route you want to travel using Google Earth, first install the software and then open it on your computer. Then click the button in the upper left-hand corner that says “Get Directions”. Now enter your starting and ending locations (in this case, Breckenridge, Colorado and Colorado Springs, Colorado). Then click “Enter”.
You should be presented with an image that looks something like this:

As was the case with Google Maps, you have the option of clicking the bicycle icon and Google Earth will tell you which route is better for traveling by bike.

It should also be noted that Google Maps has its own version of the Pegman.
Just like in Google Maps, dragging the Pegman over a location on your route in Google Earth and letting him go will show you what the road in that part of your route looks like. Note the route lines running across the screen now – indicating the route of travel outlined by Google Earth.
In the sidebar on the left-hand side of the screen, scroll down to the bottom of the directions Google Earth has provided and click the text that reads, “Save Route to My Places”.
Clicking this button will save this particular route so you can access it in the future. You can also change the name of this route, should you choose to do so.
Now click the route you just saved in the “Places” box in the sidebar on the left-hand side of the screen. With the route now selected, click the “Play Tour” button:

After clicking the “Play Tour” button, the Google Maps 3D viewer will automatically start the tour from the departure point, oriented in the correct direction as if you were flying over the route you have marked. The tour follows the route, stops at the end, and zooms out to encompass the entire route in the 3D viewer.
Depending on the length of the route you have selected, this digital tour of your route may last only a few seconds, or could take several hours. While the Google Maps tour is a useful tool in scouting out the roads you plan to cycle on any given bicycle tour, I don’t recommend you get too obsessed with it.
Previewing the entire route online, for example, takes a little of the excitement out of going somewhere new. But if you are worried about a particular stretch of road or you want to feel better about the route you have selected, viewing your route in this way can tell you a lot about your intended route of travel and what can expect once you get to that location for yourself.
With Topographical Maps
In addition to mapping out your route with traditional road maps and online tools such as Google Maps and Google Earth, you might also wish to know how much elevation you can expect to gain or lose on a particular route.
There are several ways to access this topographical information, but one of the easiest ways to do it is with a website called: www.bikeroll.net
Just like we did with Google Maps and Google Earth, go to www.bikeroll.net and type in the starting location and ending location of your intended bicycle tour. Then click “Enter”.
I will continue to demonstrate how this works with our previous example – cycling from Breckenridge to Colorado Springs.
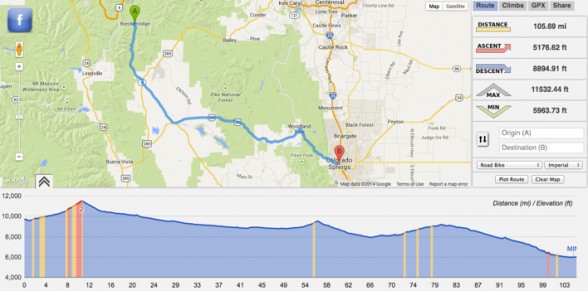
Bikeroll.net is built on the Google Maps API, so the map that appears in the top portion of the screen will look exactly like the map we created earlier with Google Maps. The major difference between Google Maps and Bikeroll.net, however, is that Bikeroll.net provides you will the topographical information you need to see the elevation gains or loses from your intended bicycle touring route.
In the bottom half of the screen is this topographical information. With your starting location (in this case, Breckenridge) depicted on the left and your ending location (Colorado Springs) on the right, you can see that the 105 mile route between these two cities is largely a downhill ride with only three small uphill climbs peaking around mile 10, mile 56 and mile 80.
Knowing how much climbing you will have to do on any given day is not entirely necessary for any bicycle tour, but if you are on tight timeline and can’t afford to fall behind schedule, then knowing about steep or long mountain climbs in advance will help you to plan how far to cycle on any given day.
With A GPS
If you plan on bicycle touring with a GPS (Global Positioning System) or GPS enabled smartphone, you’ll definitely need to factor this into your route planning.
A GPS is not necessary for bicycle touring of any kind, but it can definitely come in handy, not only for route navigation, but for keeping stats about your daily rides, marking locations of interest, geotagging your photos, and a whole lot more.
While there are several bicycle-specific GPS devices currently on the market, most of them will not tell you exactly which cycling-specific route to take in the same way that a vehicle GPS usually functions. Instead, most bicycle-specific GPS devices function very much like a traditional vehicular GPS, except that they come with a few cycling-specific features, such as on and off-road navigation option, points of interest (POIs) specifically for cyclists, and are compatible with optional heart rate monitors, etc.
The easiest way to use a GPS for route navigation is to either find someone who has traveled the same route you intend to travel and to obtain the GPS coordinates for that trip from that individual, or 2) to create your own GPS route coordinates online and then to upload those coordinates to your personal GPS device.
There are a number of places online to find bicycle touring GPS coordinates.
For example:
- The Adventure Cycling Association Route Network
http://bicycletouringpro.com/adventure-cycling-gps
- EuroVelo Routes
http://cycling.waymarkedtrails.org/en/#routes
- Ride with GPS
http://ridewithgps.com/find
With the routes now uploaded to your GPS device, you just need to follow the navigational line on your GPS’ screen and you will be able to follow the recommended path of travel.
If you wish to create your own GPS coordinates for a route of your own making, you can use Bikeroll.net to easily export your route’s GPS file and then upload it to your GPS device.
To do this, just go to www.bikeroll.net, enter your starting and ending destination, adjust the map in any necessary way, and then click the GPX option in the upper right-hand corner of the screen.
Now select whether you want to download either the GPX-Route, GPX-Track or both the Route and Track. I suggest you download both the Route and Track at first and then experiment as to which serves you best.
Then give your route GPX file a name and click the “Export GPX” button.
Your GPX data will then be saved to a single file on your computer, which you will then be able to upload to your GPS device.
Further Map Planning Examples
I’m currently in the process of planning a bicycle tour from Poznan, Poland to Oulu, Finland. Along the way I will cycle through a total of five different countries and spend more than three months on the road. Because the tour is so long, I won’t be planning out every single day in advance, but I will be creating a flexible itinerary that I can use to plan my bicycle touring adventures.
I start by mapping out the very basics of my bicycle tour. I know I’ll be starting in Poznan, Poland and finishing in Oulu, Finland. In addition to that, I know I want to cycle through the cities of Gdansk (Poland), Vilnius (Lithuania), Riga (Latvia), Tallinn (Estonia) and Kajanni (Finland), so I add those points to my initial route plan and record the results.
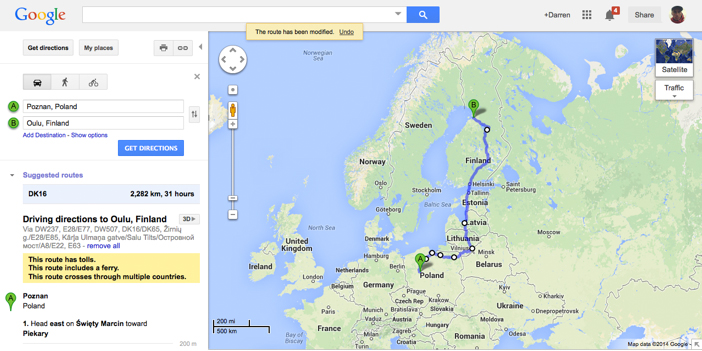
Google tells me that the route I have planned is approximately 1,418 miles (2,282 km). This route will get a bit longer once I start adding more specifics, but for now it’s important to note that 1,418 miles would be a reasonable distance to cycle in a 3-month period.
Now I need to add some more specifics to my plan.
I’ve planned for this bicycle tour to take place between May 13 and August 11. Because I’ll be traveling in Schengen Europe as a citizen of the United States, I have only 90 days to spend in the area before I have to leave again, so I’ve scheduled the trip to take place within a strict 90 day period.
On top of that, there are a number of activities I want to do besides just bicycle touring on this particular trip. For example, I want to stay in Poznan, Poland (my starting location) for a few weeks and take some table-tennis (ping-pong) lessons. I also have some friends in the city, so I want to spend some time with them while I am there. So, after leaving Los Angeles on May 13th and arriving in Poznan, Poland on May 14th, I’ve decided to stay in the city until the 9th of June.
Then I’ve scheduled a self-guided bicycle tour with an established bicycle touring company in Latvia and Estonia. The bike tour begins in Riga, Latvia on July 1st and finishes thirteen days later on July 13th in Tallinn, Estonia. So, that bike tour will need to be factored in to my overall plans.
I’ve also gone ahead and scheduled a second self-guided bicycle tour with a separate bicycle touring company. This is a 9-day bicycle tour around the Lake Oulujarvi area in central Finland and it takes place between August 2nd and August 9th.
Finally, I have to get back to Helsinki, Finland for my flight out of Schengen Europe on the 11th of August, so at this point in the planning stage I have some very important dates already laid out.
May 13: Fly out of Los Angeles, California, USA
May 14: Land in Poznan, Poland
May 15 – June 9: Take table-tennis lessons in Poznan, Poland
July 1 – July 13: Self-Guided Bicycle Tour from Riga, Latvia to Tallinn, Estonia
August 2 – August 9: Self-Guided Bicycle Tour around Lake Oulujarvi, Finland
August 11: Fly out of Helsinki, Finland
You should note that there are some major gaps in the schedule at this point. Between June 9th, when I leave Poznan, Poland and July 1st when my self-guided bicycle tour in Riga, Latvia begins, there is currently nothing planned. Additionally, there is also nothing planned between the end of my bicycle tour in Tallinn, Estonia on July 13th and the start of the second self-guided bicycle tour in the Lake Oulujarvi region of Finland on the 2nd of August.
These two major gaps in time are for when I will be bicycle touring on my own (or conducting my own self-supported bicycle tour).
In reality, this is all the planning I am going to do for this particular tour. I’ve already rented an apartment in Poznan, Poland for my time in the city and I have no idea where I will be staying each night once I begin my self-supported bicycle touring adventures. But I’m comfortable doing this because I’ve been to Poland several times before and I know what I can expect once I arrive there, and because I’ve gone bicycle touring so many times in the past that I am now comfortable having very few plans at all. My only real plan once I leave Poznan is to arrive in Riga, Latvia (some 750 miles/1,200 km away) in time for the start of my self-guided bicycle tour on July 1st.

But let’s imagine for a moment that I wanted to plan out every single day of the bike ride from Poznan to Riga. How exactly might I do that?
The best way to start is at the very beginning, by dividing the route up into smaller, more manageable segments.
Just looking at the map and the major cities that I’m planning to cycle through on this leg of the trip, I can see a way to easily cut this route down into three smaller sections.
- Poznan, Poland – Gdansk, Poland
- Gdansk, Poland – Vilnius, Lithuania
- Vilnius, Lithuania – Riga, Latvia

For the purposes of this demonstration, let’s look at just the first of these three segments – the bike ride from Poznan to Gdansk.
After a quick look at the cycling-specific route recommended by Google Maps, we can see that this segment of the bicycle tour is approximately 180 miles (290 km).

If we were to plan on riding just 45 miles each day, that would mean it should take us only four days to cycle from Poznan to Gdansk.
But maybe we don’t want to cycle the most direct route between these two cities? Maybe there are some things along the way that we want to see and experience before arriving in Gdansk?
To find these possible attractions, a little online research is necessary.
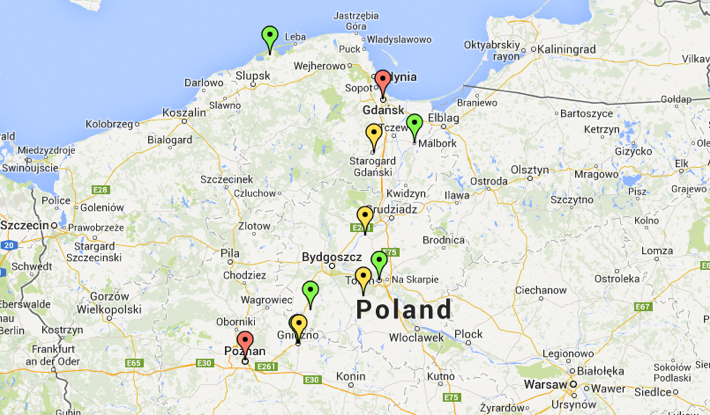
For example, after just a few minutes of research I was able to identify several possible things to see and do during the bike ride between Poznan and Gdansk:
- Gniezno – the original capital of Poland
- Slowinski Sand Dunes
- Malbork Castle
- Biskupin – an ice age village
- Torun – hometown of astronomer Nicolaus Copernicus
I’ll map each of these tourist attractions on our map so you can see where they are located. I’m using another free mapping service at www.zeemaps.com to mark my points of interest and save my map online so I can access it later and make future changes.
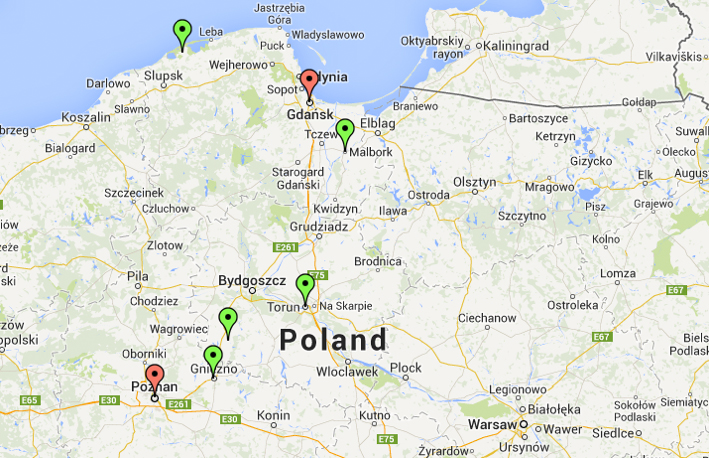
The red placemarks on the map above are the cities of Poznan (in the south) and Gdansk (in the north). The green placemarks are representative of the places of interest we found during our Internet research.
With the places of interest now mapped out, we can begin to see a line of travel starting to form between Poznan and Gdansk.
The first three green placemarks at the bottom of the screen create a natural line leading from Poznan in the south to Gdansk in the north, so we might just choose to alter Google’s original recommended route so that we can visit these three places of interest.
The green place marker up and to the left of Gdansk is representative of the Slowinski Sand Dunes. It’s a little too far out of the way to visit on this bike tour. And the green placemark to the right of Gdansk, which is marking the location of the Malbork Castle might be better to visit after leaving Gdansk, during the second major stretch of this bike tour between Gdansk and Vilnius, because it is located east of our destination city.
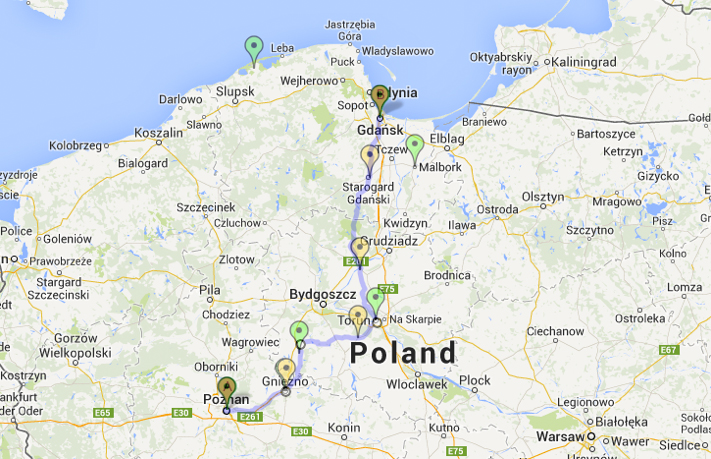
Altering our original Google map route just a little bit so that we can now cycle through Gniezno, Biskupin and Torun, our new bicycle touring route has increased from 180 to 216 miles.
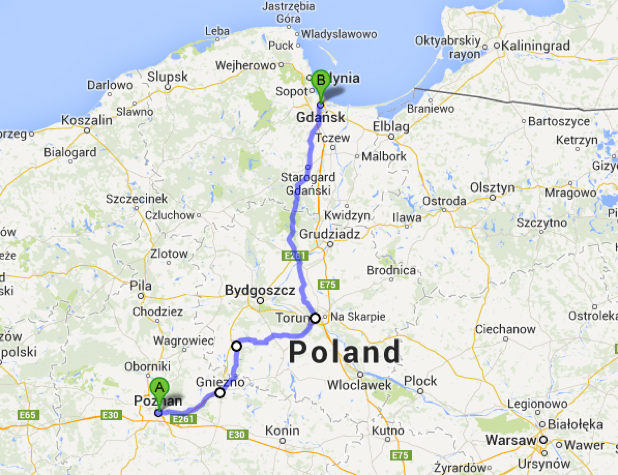
216 miles divided by an average of 45 miles per day equals 4.8 days. If we round up, we can expect this new route to take up approximately 5 days to complete.
Now we need to figure out where we are going to sleep for the 4 nights we are on the road plus the night of arrival in Gdansk.
To do this we start by breaking up our now 216 mile stretch of road into five smaller segments, representing the five days of cycling we expect this route to take. In essence, we want to create five small segments that measure between 40 and 60 miles apart.
Here, for example, is how we might do that:
The yellow placemarks represent the four nights of lodging during our bicycle tour from Poznan to Gdansk. The fifth night of lodging would be in Gdansk itself, so there is no yellow placemark located there.
My itinerary at this point looks like this:
- Day 1: Poznan – Gniezno (32 miles)
- Day 2: Gniezno – Gniewkowo (58 miles)
- Day 3: Gniewkowo – Chelmno (42 miles)
- Day 4: Chelmno – Starogard Gdanski (50 miles)
- Day 5: Starogard Gdanski – Gdansk (36 miles)
It should be noted that at this point of the planning process I’m not sure if there are places to stay in each of these various cities. I’ve only chosen these cities as starting and ending locations each day because they are both along the route I wanted to travel and because they are located within that 40-60 mile per day range.
After I have a general idea of where I might be able to stay each night on the bike tour between Poznan and Gdansk, only then do I begin trying to find hotels or campgrounds to stay at in each of these destinations. This is where I once again turn to the Internet to research possible lodging options.
After some quick research I find the following places to stay in each of these cities.
- Day 1: Hotel Feniks ($38 USD per night)
Wrzesinska 18, 62-200
Gniezno, Poland
+48 61 477 97 65
- Day 2: Zajazd Harasówka ($65 USD per night)
Katna 14, 88-140
Gniewkowo, Poland
+48 52 355 80 78
- Day 3: Karczma Che?mi?ska ($52 USD per night)
22 Stycznia 1B
Chelmno, Poland
+48 566790605
- Day 4: Hotel & Restauracja REN (Price unknown)
ul. Skarszewska 5
Starogard Gdanski, Poland
+48 (58) 56-259-48
- Day 5: Hotel Focus Gdansk (Price unknown)
ul. Elblaska 85
Gdansk, Poland
+48 58 350 08 01
After having found hotels for each night of the 5-day bike tour from Poznan to Gdansk, I’m pretty much finished. The only thing left to do is transfer my plans to either a paper map and/or a digital navigation device which I can carry with me on by bicycle.
At the moment, I am using an iPhone application called “Pocket Earth” to save offline versions of my intended routes to my iPhone, so that’s what I would do now. I would open Pocket Earth on my iPhone and then enter all of the important locations we created in the steps above into the device. Pocket Earth will then suggest the fastest cycling route between these multiple locations.
For example, I’d start by entering “Poznan, Poland” as my starting location and then I’d enter in the address of the hotel in Gniezno, Poland next. Then I’d enter the ice age village in “Biskupin” as the next major stopping point and the hotel in Gniewkowo after that. The city of Torun, Poland would be entered next, and then the address of the hotel in Che?mno after that. The hotel in Starogard Gdanski would be entered next, and then we’d finish this particular part of our bicycle touring route with the address of our hotel in Gdansk. Once all that information was entered, we’d save the map data to our iPhone so that once we are on the road and away from Internet access we can view the course we are supposed to be following and successfully navigate our way from one location to the next.
Now, if you remember, this was just the first of three major segments on my bicycle tour from Poznan, Poland to Riga, Latvia. I would need to continue this planning process for each of the remaining two legs of my trip in order to complete the planning process.
If I were on a tight schedule and wanted to plan out every single day of the bike ride, I could. Or, if I wanted, I could wait until reaching the end of each segment (in this case, the city of Gdansk) before planning out the details of the next leg of the trip.
On shorter bicycle tours, it will be easier to plan out the entire details of the tour in advance. But on longer tours (more than 2 weeks in length), you might not want to plan out every single detail in case you fall behind schedule, encounter bad weather, or you find a place you really like and decide you want to stick around for a while longer.
* * *
Now use the information from this article to create your own bicycle touring route plan and/or travel itinerary.
- Decide upon a general area or destination for your bicycle tour.
- Pick a starting and ending location for your tour, keeping your timeline in mind (Can you cycle between these two points with the amount of time you have available?)
- Make note of any cities or points of interest between your starting or ending locations that you would like to visit and plot these points onto a map.
- String together the multiple points of interest into a lose bicycle touring route plan, enabling you to see as many of those points of interest as possible during your bicycle tour.
- Get specific by researching how far you might cycle each day, where you might sleep each night, and what you can expect to see or do along the way.
- Try to plan your bicycle tours so that you have something to look forward to at least every two to three days. You don’t want to plan long stretches of travel where there is nothing to see or do for days on end, as this can be difficult and demoralizing to get through.
- Once you’ve created a route plan that you are happy with, transfer your final routes to traditional paper road maps, an offline mapping application or to digital GPX files which you can then upload to a GPS device. Planning your routes online is great, but you need a way to carry that planning information with you once you hit the road.
Fine article Darren. I especially liked the links you provided to some of the online resources. I’d never heard of CycleRoute.org, which looks to be very useful.
Your point about Google Maps bicycle routing not being completely correct is a good one. It’s put me on some very busy state and county highways. Caveat emptor.
Best wishes for a great northern European tour!
Great article. An additional resource available from some US states are bicycle maps. Both MN and CO offer these and they are very handy. They color code the roads detailing shoulder width, paved or not as well as traffic load. So very quickly you can look at the map and see what each of the potential routes is like. They also show roads where bikes are not allowed. These maps are often free, are periodically updated and may be available as PDF download as well. The only downside is that state level maps do not include many of the great county roads that have 6ft+ paved shoulders and minimal traffic.
On another thought, I like to camp along the way (it enhances the sense of freedom bike touring provides) but finding campsites is a PITA! It is one of the few things the internet does not do well.
I agree Nick, finding campsites is a pain! Google Earth will show a lot of them if you go to Layers and check “parks, recreation”. You can also call the cities you will go through, they often will let you camp in the park right in town for free! If they have a swimming pool in town, you have a shower too! One time I called a little store in Wyoming, and the lady there told my my route wouldn’t work, and suggested that I call a certain bike shop in Laramie, and the guy there suggested a great route.
Very clear article – thanks Darren.
Trev
One word of caution when using the Cycling option with Google Maps: the suggested route is sometimes not a paved road, in fact could be a path, forest road, fire lane, farm lane, private lane or other restricted access dirt/gravel/sand “road” that is definitely not suitable for bicycle touring. It has happened to me more than once, so checking out the route with “Pegman” is a great idea (but even this has limitations too, as not all paved roads have been photo’d by Google).
Just be flexible and prepared for the unexpected, and Enjoy the Ride! where ever it takes you.
Hi guys! Really useful article, thanks for sharing! I would recommend a free tool to make gpx to kml files or vice versa, when you need: https://gpx2kml.com/. No need for installation, just upload files and see the conversion, maybe it’s worth trying.
Great article Darren! I plan tours on Google Earth and I think it is a great tool. Also, Google Maps is useful. I choose the “My maps” option, “create”, click the “directions” icon (looks like a Y”, and type in the start and end points, and click the “hand” tool to edit the route. There is also a “bicycle” route option. Then you can export the route by clicking the menu next to “add layer and share” and export as a .kmz. Then open it in Google Earth, save it in “my places”, and you have a nice path in GE! If you right click the path you can even get an elevation profile. I take a screen shot of that and edit it in Photoshop and save the file in my Dropbox public folder. Then I link to that in a placemark to accompany the path. You can search the net for lodging, restaurants, anything, bike shops!, and add icons for them along the path. Thanks again for the great tips. Happy Touring!
Hi Darren,
This is really great info, thanks so much for sharing.r
I have two questions:
1-it looks like cycleroute.org is down, would you know some other source of info we could tap into to get the route topography info?
2-You mentioned pocket earth, is this only for Apple, would you know something similar like it for Android?
thanks a lot
Eric
I’ve plotted a bike route with a bike map app and I travel it with Google Earth/street view.Thanks for the GE instructional,better than following the route manually..kool! St.Louis was hard to plot, coming from the north.Winding river and only “Limited access” bridges.There is “levi” roads and a “walk/bike “bridge on the east side,giving access to the south bound bike trail past the ARCH,then a great city boulevard to south of the city.BUT..your GE plotted me onto freeways! OOPS !All goes well???Wisc. to Jonesboro Ar.along the Great River Road on the west side of the Mississippi.
Very fine article Darren! I have taken numerous cycle adventures throughout the world now and use a system pretty much like yours to plan and map my routes. I typically use a 1 inch binder to keep all my travel related documents (maps, ferry schedules, reservations etc.) in chronological order so that I have a hard copy of everything in addition to what I save on my smart phone. The binder fits nicely into my Ortlieb panniers inside pocket and then provides a permanent record of each journey to keep on my bookshelf. Off to Southern France and Sweden over the next few months. Packing up my bike for one trip and renting a hybrid style trekking bike on the other. I love it!