How To Equip Your Car, Truck or Van with Solar Power
Equipping your car, truck or van with a roof-mounted solar system is easier than you might think! Here’s how you do it…
Use the step-by-step instructions on this page to quickly, easily and inexpensively mount solar panels to the roof of your vehicle, and then use the power of the sun to generate electricity for your various electronic devices – i.e. laptop computers, tablets, smartphones, drones, GPS devices, flashlights or anything else than can be charged via USB or a standard 110 volt power outlet.
The Gear Your Need
Here’s a detailed list of everything you need to install a solar power system in your car, truck or van:
- 1 vehicle (equipped with a roof rack)
- 2 HQST 100 Watt Flexible solar panels – $185 each ($370 USD total)
- 1 HQST 20FT Solar Adapter Cable – $23
- 1 8FT Wire Copper Tray Cable, Connect Charge Controller – $16
- 1 400W Power Inverter with Dual USB Ports – $33
- 1 Renogy Rover 20 Amp MPPT Solar Charge Controller – $116
- 1 12V 100AH Deep Cycle Battery – $175
- 1 1/4 inch thick plywood to mount solar panels on – $20
- 1 roll of plastic tarp – $5
- 1 bottle of glue – $5
- 2 – metal bolts – $2
TOTAL COST: Approximately $765 USD
Your Vehicle’s Solar Setup – A Complete Overview
Here’s a quick run-down of how the solar system is going to work:
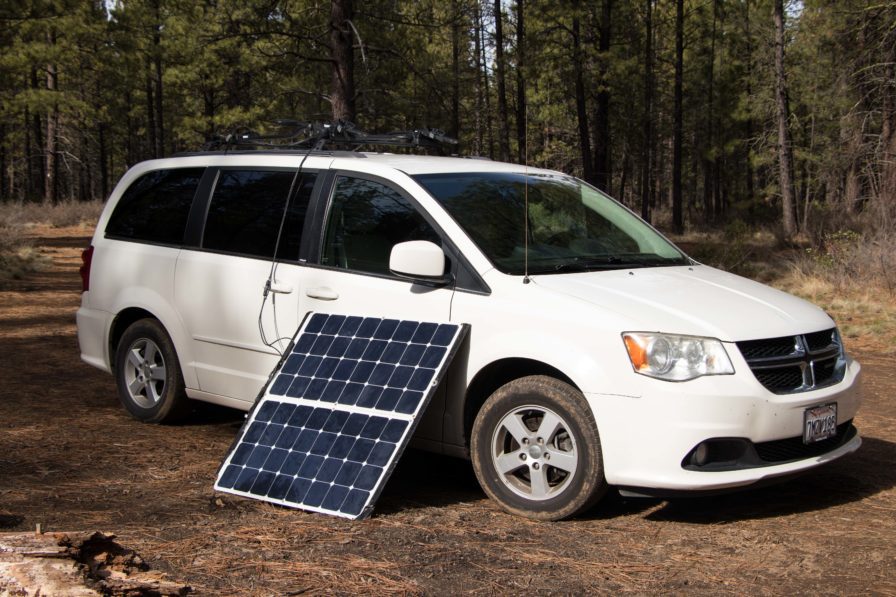
Two 100 watt solar panels will be mounted to the roof of your van and secured to your vehicle’s roof rack. These two solar panels will generate electricity harvested from the power of the sun, and the energy that these two panels create will be passed through a series of adapter cables to your solar charge controller. From the charge controller, the energy will pass through another series of cables to your deep cycle battery, which is where your solar energy will be stored until it is ready to be used. Then, from your deep cycle storage battery, a final series of cables will run to a small power inverter, which is where you will be able to plug in any of the devices you wish to charge or power.
Mounting the Solar Panels to the Roof of Your Vehicle
The most difficult part of equipping your car, truck or van with a solar system such as this is figuring out how to safely mount the solar panels to the roof of your vehicle. The solar panels, after-all, need to be mounted to the roof in such a way that they are protected from the elements, aerodynamic, and won’t fly off the roof when your vehicle is in motion at high speed.
To secure the two 100 watt solar panels to the roof of your vehicle, you’ll need to first mount the solar panels onto the top of a thin plywood board or sheet of metal. You can use an inexpensive piece of plywood from your local hardware store for this purpose. A plywood board of the right dimensions will cost you about about $20 USD. While you’re at the hardware store, spend another $5 on plastic sheeting and wrap that sheeting like a Christmas present around the outside of your wooden board. Now, secure the plastic in place to the outside of the board with a healthy dose of glue.
After the plastic sheeting had dried around the board, placed the two solar panels on top of the board and drill holes through the eyelets on the sides of the solar panels into the board below. Then secure the solar panels in place on top of the board with the use of twelve small bolts and nuts (six bolts/nuts per solar panel).
Please note that the HQST solar panels I recommend you buy come pre-drilled with six eyelets on the sides of the solar panels, so you don’t need to do any drilling into the solar panels yourself.
Now that you have both solar panels mounted to a flat and nearly waterproof board, you’re ready to mount the entire array to the roof of your vehicle.
To do this, you need a roof rack on the top of your car, truck or van. And on your roof rack, you need to locate at least two or more holes than you can fasten your solar array to. Most roof racks will come with at least four or more such attachment holes, but many roof racks come with 6 or 8 such attachment points.
Once you’ve located two or more of the various attachment points on the roof rack of your car, position the solar array board onto the roof of your vehicle, making note of where the board lines up with the attachment points on your roof rack. Mark the position of these holes on the solar array and then drill a hole through the board (not the solar panels) that is going to be big enough to run a bolt down through.
Now, find a bolt that can be screwed into the attachment point on the roof rack of your car and equip it with a big, fat washer. The wider, the better!
Now, position the bolt and washer down through the top of solar array board and into the roof rack on the top of your vehicle. Screw the bolt into position and then repeat as necessary for each of the other attachment points on the roof of your vehicle.
This task is going to take some work and will be different for each individual, depending on the model of your car, the type of roof rack you are using and a whole host of other factors. In summary, however, you simply want to mount your solar panels to a board, which is then fasted with the use of bolts and washers to the top of your vehicle via its pre-installed roof rack.
After you have the solar panels mounted to the roof of your vehicle and in position, you’re ready to move on with the rest of the installation.
Setting Up Your Solar Power System
After mounting the solar array to the top of your vehicle, cover the solar panels with a heavy blanket so that no sunlight is reaching the panels. This is important so that when you connect the wiring you don’t burn out the charge controller or any of the other electronic devices. Only uncover the solar panels once you are finished setting up your entire solar system and have all of the electronic cables in their proper position.
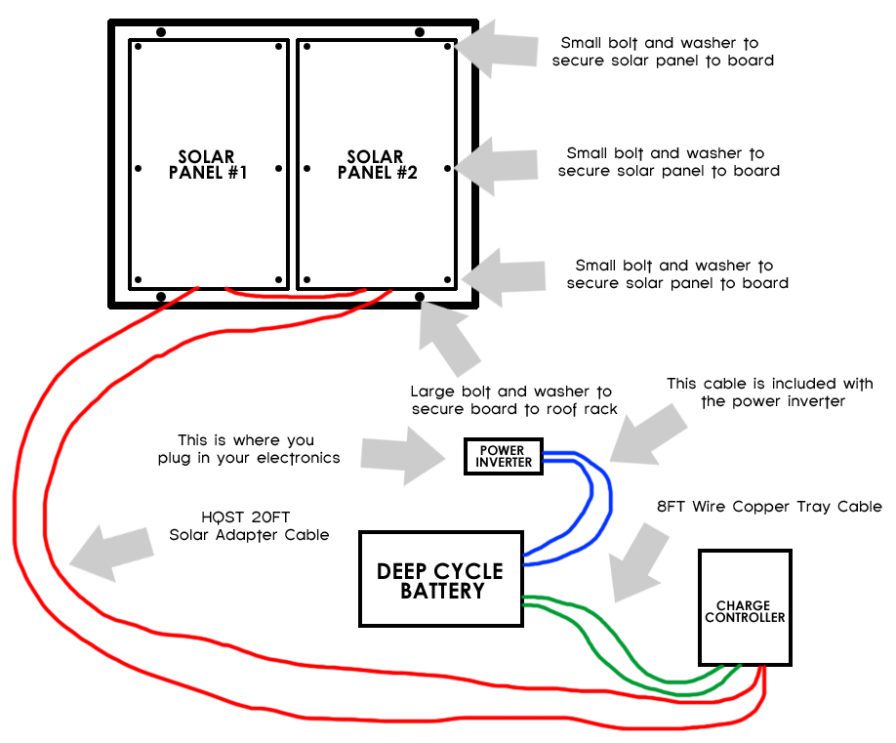
Use the diagram above to set up your roof-mounted solar system.
The20FT HQST solar adapter cables connect to the cables running out of the solar panels. Then run the cables down through your vehicle to the charge controller. Once you have these cables connected, run the shorter 8FT wire copper tray cables from the charge controller to your deep cycle battery. Then, using the smaller cables included with the power inverter, connect the power converter to your system.
Figuring out there to safely store and mount your battery, charge controller and power inverter will vary from vehicle to vehicle. I have my deep cycle batter stored in the center compartment in the floor of my van and the charge controller and power inverter stashed under the front passenger seat, but you may choose to install your components different. Whatever you do, be sure that your battery, charge controller, power inverter and all included cables are fastened down so they don’t move or come undone when your vehicle is in motion (of if it is involved in an accident).
Once you have everything connected properly, remove the blanket from the solar panels on the top of your car, truck or van… and you should begin to see some action on your charge controller’s display.
Depending on the angle and intensity of the sun, you will be able to generate as much as 10 or more amps at any one time using this unique and easy to install solar power system.
If you have any questions about the gear I’ve used here, how I’ve set things up, or anything else related to this roof-mounted solar system for your car, truck, van or camper, please leave a comment below and I will get back to you just as soon as I can.
No, but I should probably make something like that in the future.
Hi Darren,
Really enjoyed your excellent video on the van solar install. I’m doing something very similar and I was wondering if you could offer some insights into the removal of the second row of “stow and go” seats. I have the same van, want to do the same thing, and there seems to be very little about how to do this.
I didn’t record the process of removing the rear seats, but there were basically some very obvious bolts that needed to be removed in order to take the seats out. It was very easy!
Trying to do this on my honda fit. Seems like all the roof racks I look at wouldn’t work with the solar mounting. What bran are you using and can you show a bit more of the direct attachment points
Very cool! I am setting up a van for similar use as your van, and the thought of adding solar power hadn’t yet occurred to me; so this is a great set up and will be an addition to my van set up. My questions are regarding the typical time needed to charge the deep cycle battery (realizing that the charge time varies with the season / sun direction and amount of cloud cover) and approximately how long the charge on the battery lasts for your typical days use (which will depend on the number of devices needing charged and how long you are on your laptop, etc.). Thanks for any insight you can provide.
Lastly, do you use a MiFi device or your phone to get internet service when away from a WiFi source?
Thanks!
It is really hard to say how long the solar battery lasts and how long it takes to recharge, because it depends on which devices you are powering and how sunny it is, etc.
I liked how you did your car, i have one like this, could you tell me the link you bought the windows cover ?
https://www.heatshieldstore.com/
Could you please send me the website name where you bought the window ‘shields’ to block out the light in your mini-van, please?
https://www.heatshieldstore.com/
Hey man I was looking around for a long time for my Toyota Sienna
Your demo is fantastic you nailed it
Awesome !
Thank you
I’m curious. How/where does the solar adapter cable coming off the roof-top panels enter your vehicle’s interior?
The cable just comes through the sliding door on the right-hand side of the van. I didn’t have to drill a hole in the van or anything.
I enjoyed this video and it nailed it.
Use this to keep warm.. ebay..
12V 5KW Diesel Air Heater LCD Thermostat For Truck Car Boat Trailer RV Motorhome
Thanks for the videos. Though I don’t live in my vehicle I want to set it up for living. I have a Ford F-150 with a shell over the bed. I like your solar setup and hope to be able to have my setup similar to yours, simple, quick and efficient. Though I often drool over the van builds, you are right they are really luxurious in space and that’s not really what I’m going for.
I’ve been agonizing over my power needs (I still have to work even though I want to travel too) and I think your system will provide what I need…maybe a lithium battery with more storage capacity but basically the same.
I really appreciate your sharing and I wish you well in your travels.
Hi Bryan.
The video conversion of your 2011 Dodge Mini Van is quite interesting and quite informative. Many Thanks for all the Hours work went into making the video.